

Fiberglass damage shows up on almost every boat at some point. It usually comes from everyday stuff, a small bump at the dock, an anchor that slips, or years of sun and water slowly wearing things down (real life, honestly). Small cracks and chips don’t always look like a big deal at first, but they can turn into bigger problems if they’re ignored. That’s what surprises a lot of owners. The good news is that fiberglass repair is often easier than people think. With the right tools, a bit of patience, and clear steps, many common repairs can be done at home. It’s not flashy work. It’s calm, hands-on effort that pays off over time.
This guide is made for real boaters. That means weekend anglers, families who enjoy DIY projects, and even commercial operators who like taking care of their own gear, people like you. Using plain language, it walks through DIY fiberglass repair in a way that’s easy to follow. You’ll learn how to spot damage early, pick materials that last in sun and salt, and fix cracks, holes, and gelcoat the right way. It also covers common mistakes, basic safety tips, and when a full boat fiberglass repair kit makes more sense, usually for deeper or repeat damage.
Saving money and skipping long repair waits matter, but there’s more than that. Learning to work on your own boat often builds confidence, and that can make owning a boat a lot more enjoyable.
Understanding Fiberglass Repair and Why Damage Spreads
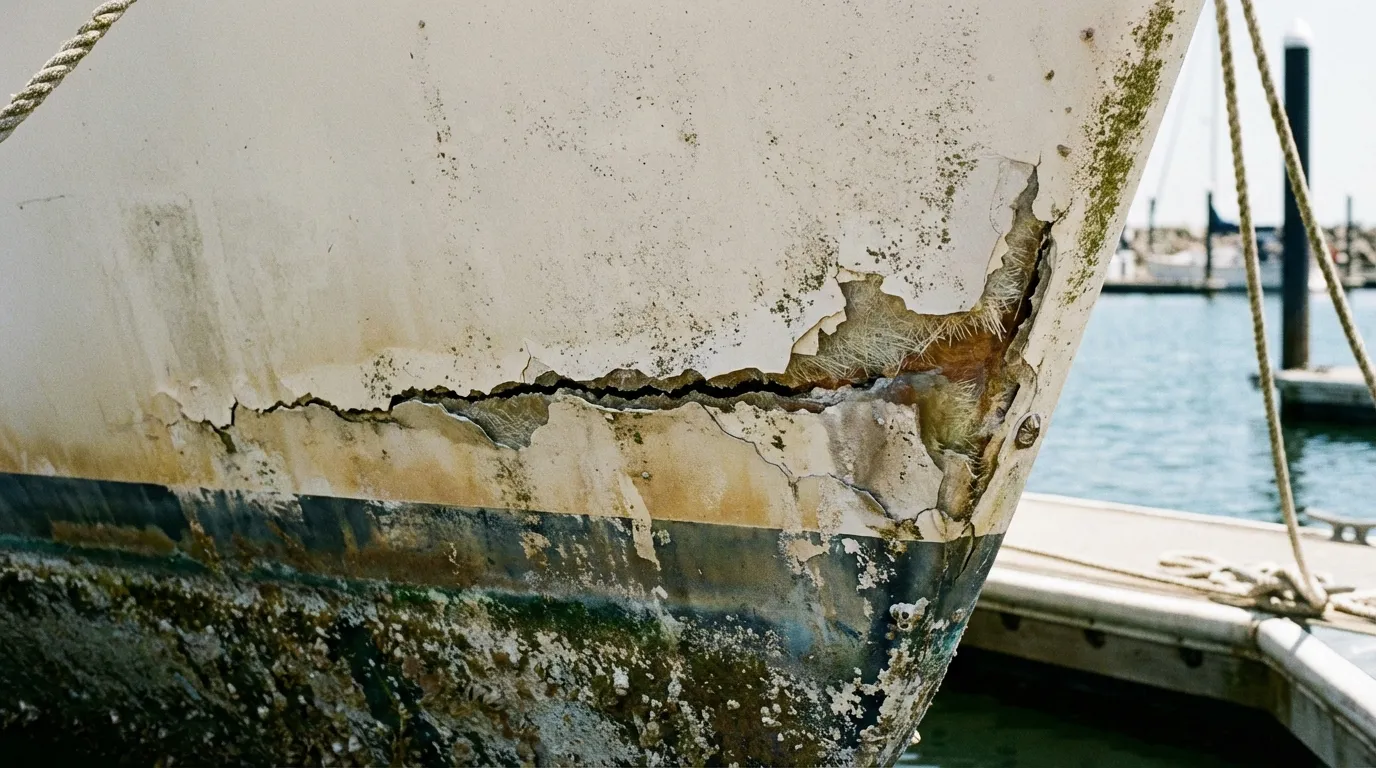
What surprises many boat owners is how quietly fiberglass damage can grow. Fiberglass is strong and light, which helps explain why it’s so common in modern boats. It also holds up well over time, even though it isn’t indestructible, nothing on a boat really is. Most boats use a fiberglass structure with a gelcoat layer on top. That shiny outer surface isn’t just for looks; its main job is to protect the fiberglass underneath from water and long hours in the sun, which often add up faster than people expect.
Once cracks or chips show up, water often finds a way inside. Moisture can slowly move into the laminate below the surface, and that’s usually where trouble starts. As this goes on, the material can lose strength and damage can spread past what you can see. In my view, that hidden spread is the hardest part to deal with. A small surface flaw often points to a much bigger issue underneath, and industry data shows this happens often.
| Metric | Value | Year |
|---|---|---|
| Fiberglass-related repair jobs | 38% of all boat repairs | 2023 |
| Global boat building and repair market | $51.7B | 2025 |
| Boat restoration market | $1.75B | 2025 |
As shown above, fiberglass repair is one of the most common maintenance jobs boat owners deal with. Learning fiberglass crack repair early often helps avoid much more expensive fixes later, like a tiny chip turning into a major structural repair.
Gelcoats contribute to the lightweight and durable properties of composite structures. As industries seek to reduce weight and improve performance, the demand for gelcoats is on the rise.
For deeper understanding, check out Fiberglass Repair Basics: From Gelcoat to Structural Fixes for a broader overview of common techniques.
Tools and Materials That Make DIY Repairs Easier
The biggest difference between a clean fiberglass repair and a rough patch usually comes down to prep work. Before starting any DIY fiberglass project, having the right supplies makes the job smoother from start to finish. Using random or mismatched tools often leads to weaker fixes or uneven surfaces that are easy to spot. That kind of frustration builds quickly. The good news is that the basic tools are easy to find at marine stores or online, and most are affordable, especially if you’re just getting started.
Most boaters start with a boat fiberglass repair kit, and it makes sense. These kits usually include resin, hardener, fiberglass cloth or mat, along with a few starter tools. Pre-measured kits are especially helpful because they cut down on guesswork. Mixing feels simpler, which is great if you’re new or haven’t done repairs in a while.
A few other items also matter more than people expect. Sandpaper in several grits, mixing cups, gloves, and a dust mask all help the job go better. For gelcoat repairs, color-matched gelcoat paste can save time and limit redo work.
Epoxy resin has become popular as well. It often bonds better than older polyester resins and holds up against moisture over time. Marine testing groups like Practical Sailor, known for hands-on and unbiased reviews, have found that epoxy systems usually give better DIY results when the surface is prepped well.
Step-by-Step Fiberglass Crack and Hole Repair
This is the section most boat owners start with. The goal is usually simple: fix fiberglass cracks or holes before a small issue turns into a bigger problem across the hull or deck. The good news is that the basic process is mostly the same for both. You just make a few small changes based on the type of damage, which is often less intense than people expect.
Good prep makes everything else go smoother. Repairs tend to last longer when the area is cleaned well, including removing dirt and the waxy or oily buildup that often forms near fittings. Sand until you reach solid fiberglass, not soft or flaky material. It helps to slow down at this stage. When prep is rushed, it often shows later as weak bonding or uneven spots, especially once the boat is back in use.
So what’s different between cracks and holes? For cracks, grinding a shallow V-shape along the line helps the repair material stick properly. For holes, beveling the edges lets the patch blend in instead of sticking up like a bump. It sounds small, but it often affects how clean the repair looks.
Next is fitting the fiberglass cloth. Cut it to size, mix the resin exactly as directed (guessing usually leads to trouble), and fully soak the cloth. Build the layers slightly higher than the surrounding area, since you’ll sand it down later.
After curing, sand everything smooth and finish with gelcoat or marine paint if needed. Structural damage or repairs below the waterline need extra care, more curing time, and careful sanding before launch. Bigger hull repairs are covered in Fiberglass Boat Hull Repair: Step-by-Step Restoration for Structural Integrity that focuses on safety and structure.
Gelcoat Repair for a Clean, Professional Finish
What usually jumps out first on a fiberglass boat isn’t structural trouble, it’s gelcoat damage. Scratches, small chips, spider cracks, and scuffs can make a solid hull look worn very quickly, and you’ve likely seen how fast that happens. It’s annoying, for sure. The good news is that gelcoat repair is often one of the more approachable DIY boat projects, even for people who are new to this kind of work. With some patience, it’s generally manageable.
Gelcoat acts as a protective outer layer, helping shield the boat from sun, salt, and water exposure. When it’s damaged, the fiberglass underneath is left exposed, which often leads to bigger problems over time.
Marine gel coat acts as a shield, protecting boats from the constant onslaught of marine elements. Its impermeable nature creates a powerful barrier, effectively protecting the underlying fiberglass substrate from moisture penetration, osmotic blistering, and UV-induced damage.
The process usually starts with careful sanding and thorough cleaning, rushing this part often causes issues later. Next, apply color-matched gelcoat paste slightly overfilled, let it cure, then wet sand in stages and buff until it blends in. Taking your time, especially during sanding, makes a big difference. Mistakes like poor color matching or sanding too aggressively often show up in the final finish.

Advanced Tips, Safety, and When to Upgrade Your Approach
More offshore anglers now keep small emergency fiberglass patch kits onboard, and that’s usually a smart move. These kits can slow or stop water intrusion long enough to make it back to the dock, which helps when time is tight and waiting isn’t an option. Planning ahead like this often helps when repairs won’t be quick or simple.
Deep damage near transoms or stringers, especially around through-hull fittings, is where many people run into trouble. If you see flexing, soft spots, or water seeping out, that’s your cue to slow down. There are no shortcuts here. That pause matters most right when you notice moisture or movement, not later after things get worse.
You’ll want gloves and eye protection, plus a respirator when sanding or mixing resin. Fiberglass dust spreads fast and isn’t harmless. Set up good ventilation, follow cure times, and don’t rush, it often causes problems later.
When a repair exposes wood cores or transom material, reviewing Marine Wood Rot Repair: Restore Transoms and Decks Easily before sealing it up often prevents having to reopen the same area again.
Common questions people ask
Frequently Asked Questions
Can I do fiberglass repair without experience?
Yes, many small fiberglass fixes work for beginners because modern repair kits and clearer instructions make DIY fiberglass repair feel easier than before. I think you’ll find it’s doable, honestly, right now.
What is better for repairs, epoxy or polyester resin?
I usually choose epoxy for DIY repairs because it bonds stronger and handles moisture better, which often matters. That makes it a better choice for older fiberglass, especially when the fiberglass is already aging.
How long should fiberglass repairs cure before use?
Most fiberglass repairs cure in around 24 hours. The exact time depends on the product, so follow the instructions, and allow more time if it’s cool or the air feels damp.
Is gelcoat repair only cosmetic?
No, it’s usually more than cosmetic. Gelcoat protects fiberglass, so fixing chips or cracks helps keep water out and prevents related damage most of the time.
It’s serious stuff (honestly) when damage is structural or affects safety around important fittings, so DIY fixes often aren’t smart. In those cases, it’s best to avoid risk and book an inspection.
Put These Repairs to Work on Your Boat
Fiberglass repair doesn’t have to feel intimidating, at least most of the time. With clear steps and the right materials, many boat owners can handle cracks or gelcoat damage at an easy pace, even on a first try. Timing often makes the biggest difference. Taking care of small problems early usually keeps costs lower and the work simpler, with results you can see and feel. That means less stress and more confidence, which shows up pretty fast.
A close look at the boat often shows where to begin. Tackling small issues as they come up helps skills grow naturally, one project at a time, without feeling rushed. Whether it’s a fishing boat getting ready for the season or a work vessel that needs to stay reliable, DIY fiberglass repair gives owners control over upkeep and timing, which really matters when schedules are tight.
When picking up repair kits and marine-grade tools made for real boating conditions, durability matters, but it doesn’t need to be complicated. A little effort today often leads to a boat that stays safer, stronger, and better looking over time.