


A reliable marine electrical system does a lot more than power lights and pumps. It helps protect the engine, supports navigation, keeps batteries charging the right way, and makes time on the water safer for everyone, which matters more than people sometimes realize. It’s also the kind of thing many people don’t think about much until something suddenly stops working.
When electrical parts fail, even a small problem can turn into a big hassle fast. A weak ground might stop a bilge pump. Corrosion can cause navigation lights to dim. A bad battery connection could leave a boat stuck at the dock or stranded offshore, and neither one is any fun. In many cases, these issues start small, but they usually get worse when they aren’t found early.
The good news is that regular care is pretty simple when it’s broken into a few easy steps. You don’t need to be a full-time marine tech to spot early warning signs, clean key parts, or set up a basic inspection routine. That goes for a weekend angler, someone heading out with family, or a commercial boat operator. For all of them, it often matters more than expected.
In this guide, readers will learn the best ways to keep a marine electrical system in good shape. It covers batteries, wiring, corrosion control, fuse protection, seasonal care, and common mistakes to avoid, the usual trouble spots. There’s also a practical checklist that works for almost any boat, from a small fishing rig with a trolling motor to a larger work boat with several onboard systems, and it’s honestly very useful.
Start With the Marine Electrical System Parts That Fail Most Often
Most marine electrical problems start in a few common places: batteries, terminals, wire connections, switches, and fuse panels. Boats live in a rough environment, and it shows. Moisture, salt, heat, vibration, and long periods of storage all work against electrical parts. That is why regular inspection matters even more on a boat than it does in a car.
Even a quick monthly check can prevent a lot of failures. You will often spot early signs on battery posts, loose ring terminals, cracked wire insulation, and rusty fasteners. It also helps to watch for wires that droop into bilge water or rub against sharp edges, since those are easy to overlook. Small issues on a boat often turn into bigger ones when they are ignored. If a pump, fish finder, or boat lighting circuit starts to flicker, treat that as an early warning sign instead of waiting for the device to stop working completely.
Here’s a simple view of the most common trouble spots and what to watch for.
| Component | Common Problem | What To Check |
|---|---|---|
| Battery terminals | Corrosion and loose fit | Clean metal contact and tight connections |
| Wiring | Chafe, heat, cracked insulation | Look for wear near clamps and bends |
| Fuse or breaker panel | Trips or poor contact | Check rating, moisture, and heat marks |
| Ground connections | Voltage drop | Inspect tightness and clean contact surfaces |
The failure points in the table are usually easy to reach and inspect. Just a few minutes with a flashlight can save hours of troubleshooting later. For a broader overview of the layout and common problem areas, this boat electrical system guide explains how the battery, protection, and accessory circuits work together.
Keep Marine Electrical System Batteries Clean, Charged, and Properly Matched
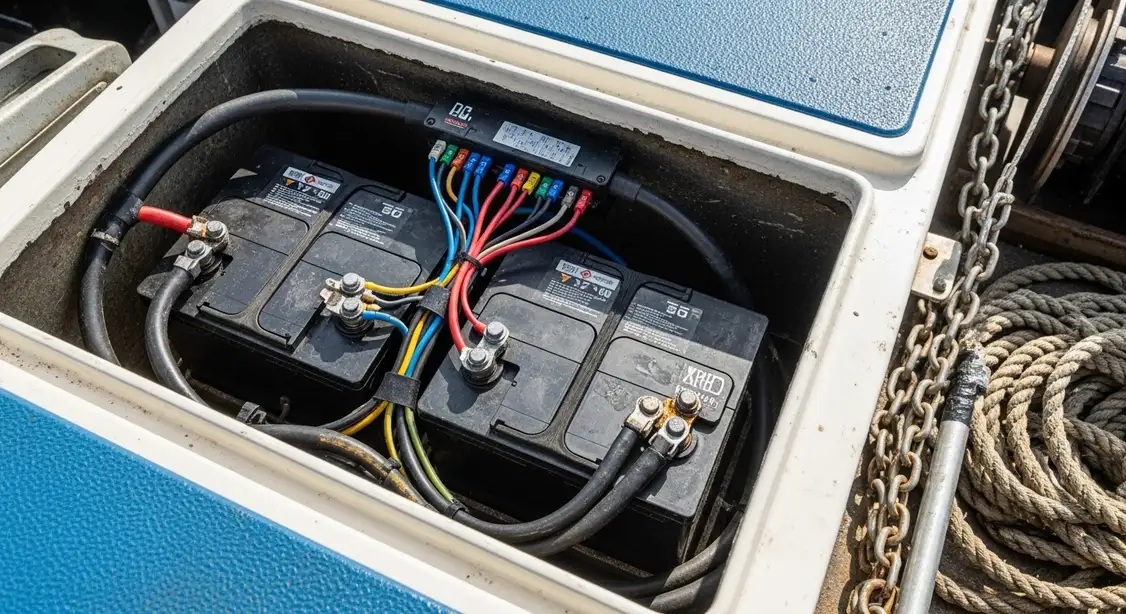
Batteries are at the center of any marine electrical system. When battery health starts to slip, the rest of the system usually becomes much harder to sort out. Pumps slow down, electronics reset, trolling motors lose thrust, and engine starting becomes less reliable. For many boat owners, taking better care of the battery is probably one of the smartest upgrades they can make, and honestly, one of the easiest.
One good place to start is making sure the battery type fits the job. Starting batteries are made for quick bursts of power, while deep-cycle batteries are built for repeated discharge and recharge. Dual-purpose batteries try to handle both roles, but they are not always the best fit for every setup. A trolling motor, for example, usually works best with a true deep-cycle marine battery, which is often the safer choice here.
Then pay attention to a couple of basic habits:
Check state of charge often
A voltmeter or, even better, a smart battery monitor is good to use here. Don’t guess. If a battery stays partly discharged too long, it will often sulfate and slowly lose capacity, which isn’t good.
Charge with the right equipment
Use a marine smart charger that matches your battery chemistry. AGM, flooded lead-acid, and lithium batteries each need different charging settings. It’s simple, but still important.
Secure and protect marine electrical system connections
Battery terminals should stay tight, clean, and covered with a marine-safe protectant, because that simple step often helps more than most people think. Battery trays and hold-downs also need to stay secure, so rough-water vibration is less likely to cause damage. It is basic stuff, really.
For DIY boat owners, this is usually one of those jobs where routine matters more than special skill. And if the batteries seem fine but the electronics still act up, you will find a deeper checklist in this marine electrical system maintenance guide.
Fight Corrosion in Your Marine Electrical System Before It Spreads
Corrosion is one of the biggest threats to a marine electrical system, and it often starts in small spots that are easy to miss. That is usually why people overlook it. Salt air, spray, humidity, and contact between different metals all make the problem worse. Once corrosion starts, resistance goes up. Then heat begins to build, voltage drops, and devices stop working the way they should.
Prevention is usually the better choice. Using tinned marine-grade wire, heat-shrink connectors, sealed fuse holders, and marine-rated switches can save a lot of trouble later. It is pretty simple, really. Automotive parts often fail sooner on boats because they are not made for wet, salty conditions, and that is often where the trouble starts.
During inspections, it helps to find light corrosion early. Clean battery posts and cable ends with the proper brush. Badly corroded terminals are usually better replaced than patched. If copper wire has turned dark under the insulation, cut it back to clean wire or replace the whole run. In most cases, hidden corrosion will keep spreading if it is left alone.
A livewell pump that only works now and then is a good example. Many owners replace the pump first, but the real problem may be a corroded connector under the console or near the bilge. The pump may not be bad at all. That kind of mistake can get expensive fast and is probably more common than most people think. It wastes both time and money.
One more tip is to remember the ground points. People often pay attention to the positive side of a circuit but overlook the negative return path. A weak or dirty ground can cause just as many problems as a bad power feed, and sometimes even the same confusing symptoms. If both sides get checked, issues will usually show up faster.
Inspect Marine Electrical System Wiring, Fuses, and Breakers With a System
Random checking often misses small problems, so it usually helps to inspect a marine electrical system in the same order each time. Start at the battery bank, move to the main switch, then the fuse or breaker panel, and after that check each device or circuit branch. Going in that order step by step often makes it easier to spot voltage loss, weak connections, overloaded circuits, and other issues that are easy to miss.
Here’s a simple way to do it:
1. Turn off power before hands-on work
Before doing any hands-on work, shut off the battery switch or disconnect the negative cable before tightening or replacing parts, it helps a lot. It’s a simple step to take first.
2. Check for correct fuse sizes
Don’t put in a bigger fuse just because one keeps blowing, really, don’t. It’s usually a bad idea because it can hide an overload or a short circuit and can damage the wiring too.
3. Look for heat signs
Melted insulation, dark marks near terminals, which are usually easy to spot, and brittle connectors can point to extra resistance or, often, an overloaded circuit.
4. Test devices under load
A circuit can seem fine with no load, but it may fail when a bilge pump or fish finder switches on, and that happens a lot. So test it while the equipment is running for real, because that’s usually when problems show up.
5. Label circuits clearly
Clear labels, even very simple ones, can save a lot of time during emergency repairs or while getting the boat ready for the season, which is often a busy day. It’s a small job, but it usually makes things much easier.
Many boat owners also find it helpful to learn a bit more about overcurrent protection. The Marine Electrical Protection Guide 2026: Fuses & Breakers explains fuses and breakers, with more detail on protecting wiring and the onboard gear used most often.
A common mistake, though, is mixing old and new wiring without checking wire gauge. If modern electronics, extra lights, or a stronger trolling motor are added, the original wiring is probably not enough. Undersized wire can cause voltage drop, weak performance, and heat.
Build Seasonal Marine Electrical System Maintenance Into Your Routine
Season changes affect every marine electrical system. The two main times to give the boat a close look are spring startup and winter storage. In spring, check for storage damage, moisture, signs of rodents, and batteries that may have lost charge. In fall, get things ready so parts do not stay wet or dirty, and batteries do not sit discharged for months. It is simple stuff, but it is easy to miss, and that happens a lot.
During spring commissioning, test chargers and check all batteries. You will also want to inspect navigation lights, make sure the bilge pump works, and confirm electronics power up properly. It is also smart to test horn circuits, washdown pumps, trim and tilt wiring, and trailer light connections, especially if the boat spends a lot of time on a trailer. Doing this before the season gets busy makes small problems easier to fix.
Before storage, fully charge batteries, clean the terminals, and disconnect power if the battery manufacturer recommends it. Store batteries safely, and remove portable electronics when possible. Dry out bilge areas too, so moisture does not sit around wire runs and connectors through winter. That often helps more than people think. Small step, real help.
Commercial boaters should also keep a written log. It helps track repeat issues, battery age, fuse changes, and charging problems over time, which can make troubleshooting faster later.
Use the Right Tools and Parts for Safer Marine Electrical System DIY Work
DIY maintenance usually goes better when you use marine-specific parts along with a few basic tools. You do not need a huge shop, which is a plus. A digital multimeter, wire stripper, heat gun, terminal crimper, battery brush, dielectric or terminal protectant, spare fuses, and labeled heat-shrink tubing can handle a lot of small jobs.
When repairing or upgrading a circuit, marine-grade wire and connectors are usually the better choice. They may cost more upfront, but they often last longer in wet, salty conditions. The same idea also works for battery switches, boat lighting connectors, bilge pump wiring, and trolling motor plugs, and in many cases it is worth it. Spending a little more in these areas often means fewer problems later.
For regular upkeep and replacement parts, First Choice Marine is a good option for boat owners who want dependable maintenance gear, electrical accessories, and engine care products in one place. Their catalog is especially useful when the job already involves related systems such as trolling motors, pumps, or other onboard accessories.
Before starting a bigger rewiring job, sketch the circuit. Even a simple hand-drawn map can help prevent crossed wires and save time, so it does not need to be fancy. It is a small step, but it usually makes the work easier. If the project involves shore power, inverter systems, or major charging upgrades, call a qualified marine electrician. For additional repair ideas and walkthroughs, this Troubleshooting Marine Electrical Systems: A DIY Guide is also useful for many boat owners.
Frequently Asked Questions
How often should I inspect a marine electrical system?
A quick visual check every month is a good baseline during boating season. Do a deeper inspection at spring startup, before long trips, and before winter storage. Commercial boats or heavily used fishing boats may need checks even more often.
What is the most common cause of marine electrical system failure?
Corrosion is one of the most common causes, especially around battery terminals, connectors, grounds, and fuse panels. Loose connections and low battery charge are also very common. In many cases, the problem is not a failed device but poor power delivery to that device.
Can I use automotive wire and connectors on my boat?
It is not the best choice. Marine-grade wire and sealed connectors are built to handle moisture, salt, vibration, and temperature swings better than standard automotive parts. Using the right materials helps your marine electrical system last longer and stay safer.
How do I know if my boat has a bad ground?
You may notice dim lights, pumps that run weakly, electronics that reset, or devices that work only sometimes. Check the negative cables and ground points for corrosion, looseness, and damaged wire. Testing voltage drop under load is often the best way to confirm a ground problem.
Where can I find marine electrical parts and maintenance items for my boat?
Many boat owners look for one place that carries electrical parts, battery accessories, trolling motor gear, and general maintenance supplies. First Choice Marine is one example of an online marine parts retailer that fits that need, especially for DIY upkeep and common onboard system repairs.
What should I keep onboard for basic electrical troubleshooting?
Carry spare fuses, a small multimeter, electrical tape, a few marine connectors, zip ties, and simple hand tools. It also helps to keep a list of your fuse sizes and circuit labels on the boat. First Choice Marine can also help owners source many of these routine maintenance items before the season starts.
Keep Your Boat Ready for the Next Marine Electrical System Trip
Marine electrical system maintenance usually comes down to a few good habits. Clean terminals before they get crusty, because that’s the kind of job people often put off. Batteries are best checked early, before they start getting weak. Damaged wiring should be replaced before it can short out. And before leaving the dock, test pumps, lights, electronics, and anything else that matters instead of finding out on the water that something suddenly stopped working, which is honestly about the worst time for it.
If only a few things stick, keep these in mind: use marine-grade parts, protect against corrosion, inspect both positive and ground connections, and follow a seasonal checklist. It’s simple, but in most cases those steps help cut down on breakdowns, improve safety, and keep the boat’s systems working like they should.
Whether it’s a small fishing boat, a family cruiser, or a commercial vessel, regular maintenance is worth the effort. Why not start with the basics this week? Open the battery compartment, check the fuse panel, and inspect one circuit at a time. Small actions now can often prevent an expensive repair later and make each trip from the dock feel more reliable.
