


Table of Contents
- Understanding Marine Audio System Wiring Basics
- Selecting the Correct Wire Gauge for Marine Speaker Wire
- Step-by-Step Installation: Battery Connections and Power
- How to Wire a Marine Radio Receiver to Your System
- Marine Amplifier Wiring and Speaker Connections
- Routing and Protecting Wiring in the Marine Environment
- Testing, Troubleshooting, and Commissioning Your System
- Common Installation Mistakes to Avoid
- Frequently Asked Questions
Last Updated: October 6, 2026
Understanding Marine Audio System Wiring Basics
Installing marine audio system wiring differs from land-based audio: salt water, moisture, and constant vibration destroy standard electrical components. This guide covers the complete process.

Regular copper wire corrodes in the marine environment. Tinned copper conductors resist that corrosion with a thin tin coating that prevents oxidation and extends system lifespan.
At First Choice Marine, we help boat owners upgrade their audio systems with confidence. Our inventory includes marine-grade cables, connectors, and installation supplies engineered for saltwater exposure.
Why Marine-Grade Cable Matters
Standard automotive or household cable fails quickly on boats: its insulation breaks down from UV exposure, salt spray, and moisture. Marine-grade cable has thicker, more durable insulation.
Quality marine audio system wiring protects your installation. Cheap cable leads to corrosion, intermittent connections, and failures far from shore.
Marine cables also feature better shielding against electromagnetic interference, reducing noise in your audio signal for cleaner music and clearer radio reception.
Tinned Copper Conductors and Corrosion Resistance
Tinned copper is copper wire coated with a thin layer of tin, which prevents oxidation and corrosion in saltwater environments.
The tin coating also improves solder connections and crimping reliability, so terminated connections hold better over time.
Corrosion resistance affects audio quality: as corrosion builds, resistance increases, causing voltage drop that weakens amplifier output and makes speakers quieter and less clear.
Products like Ancor's Super Flex Audio Cable with tinned copper construction provide this protection as standard.
Selecting the Correct Wire Gauge for Marine Speaker Wire
Wire gauge determines how much current your cables safely carry. The wrong gauge creates heat, voltage drop, and fire hazards, making gauge selection critical.
Thicker wire (lower gauge numbers) carries more current with less resistance; thinner wire causes voltage drop over distance. Amplifier power output and speaker distance determine the gauge you need.
Calculating Wire Gauge Based on Amplifier Power and Distance
Marine speaker wire gauge depends on amplifier power and cable run length. A 50-watt amplifier at 10 feet needs a different gauge than a 200-watt amplifier at 30 feet.
Here's how to calculate the right gauge:
- Identify your amplifier's RMS power output (check the manual or specification sheet)
- Measure the distance from amplifier to each speaker
- Use a wire gauge chart to match power and distance to the correct AWG (American Wire Gauge) number
For most boat installations, you'll use 12 AWG, 10 AWG, or 8 AWG speaker wire. The Fusion Speaker Wire 12 AWG 50' Roll from First Choice Marine is suitable for many recreational boat systems.

A common mistake is using thin wire to save money. Undersized speaker wire causes your amplifier to work harder, generating heat and reducing output. Your system runs hotter and fails sooner.
| Amplifier Power | Distance to Speaker | Recommended Gauge |
|---|---|---|
| 25-50 watts | Up to 15 feet | 14 AWG |
| 50-100 watts | Up to 15 feet | 12 AWG |
| 100-200 watts | Up to 20 feet | 10 AWG |
| 200+ watts | Up to 30 feet | 8 AWG |
Fuse Sizing and Circuit Protection
Every power cable from your battery needs a fuse near the battery terminal to prevent fire if the wire shorts to ground.
Fuse rating should be 80% of your cable's amperage capacity. If your cable safely carries 100 amps, use an 80-amp fuse for protection without nuisance trips.
The fuse holder must be within 18 inches of the battery terminal, per marine electrical standards that prevent long stretches of unprotected cable.
Step-by-Step Installation: Battery Connections and Power
Battery connections are where your marine audio system wiring begins and the most critical part of the installation, because all power flows through them.
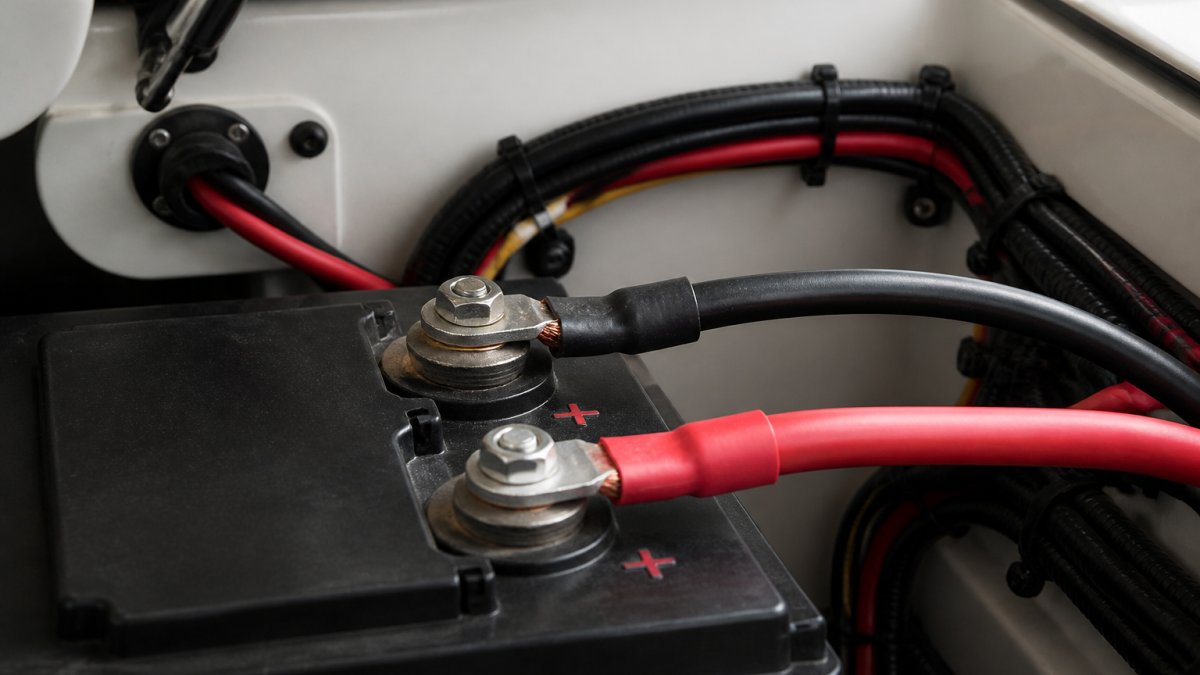
Connecting to the Battery Terminal and Ground
Start by disconnecting the negative battery terminal to prevent accidental short circuits. Always disconnect negative first and reconnect it last.
Connect the lugged end to the positive battery terminal and tighten the bolt securely. A loose connection creates resistance and heat.
Run the power cable through your boat to the amplifier location. Keep it away from the engine, exhaust, and moving parts.
Running Power and Ground Cables Through the Boat
Ground cables matter as much as power cables. A poor ground causes noise, weak output, and system failures.
Scrape away any paint or corrosion from the ground point before connecting. The connection must be bare metal-to-metal contact.
Use the same lug and crimping process for ground connections. Tighten the ground bolt securely.
Protect cables from moisture and sunlight with sheathing that guards against UV damage and salt spray.
How to Wire a Marine Radio Receiver to Your System
Your marine stereo receiver connects to the amplifier using RCA cables, which carry the audio signal at low voltage and require shielding.
Connecting RCA Cables and Signal Wires
RCA cables have two connectors per pair: left and right channels.
Keep RCA cables away from power cables, since crossing them causes interference and hum. Route them on opposite sides of the boat when possible.
Connect the RCA cables to the receiver's output jacks. Push firmly until you hear a click. Loose RCA connections cause intermittent audio or complete signal loss.
Using a Marine Stereo Wiring Diagram for Accurate Installation
Before you start, get a wiring diagram for your receiver model. Color-coded wires simplify connections: red is positive, black is negative, and other colors indicate specific functions.
Trace each wire from the receiver to its destination and mark wires with tape as you go to prevent confusion in tight spaces.
Most receivers have these standard connections:
- Power antenna wire (usually blue) connects to your antenna
- Illumination wire (usually orange) connects to your boat's light circuit
- Ground wire (usually black) connects to the chassis ground
- Remote turn-on wire (usually blue with white stripe) triggers your amplifier
The wiring diagram prevents equipment-damaging mistakes, and matching each wire correctly saves hours of troubleshooting.
Ancor Super Flex Audio Cable 14/2 100' #142410 →
Marine Amplifier Wiring and Speaker Connections
Your amplifier powers your speakers and subwoofer. Proper wiring ensures clean, powerful audio without noise or distortion.
Connecting Speakers and Subwoofers to Your Amplifier
Speaker terminals on your amplifier are color-coded: connect positive speaker wire to red and negative to black.

Use speaker wire rated for your amplifier's power output; undersized wire causes heat and power loss.
Subwoofer connections use the same process as speakers. Some amplifiers have dedicated subwoofer outputs for low-frequency signals, giving better bass control.
Connect all speaker grounds to the same point to help prevent hum-causing ground loops.
Securing Wiring with Adel Clamps and Cable Sheathing
Vibration from the engine and waves damages unsecured cables. Adel clamps hold cables firmly without crushing them; space them every 18 inches.
Cable sheathing protects wiring from UV exposure, salt spray, and physical damage. Wrap it around exposed cables and seal the ends with marine sealant to keep moisture out.
In the engine compartment, use heat-resistant sheathing: engine heat can melt standard insulation, while marine-grade sheathing withstands temperatures above 200 degrees Fahrenheit.
Routing and Protecting Wiring in the Marine Environment
Cable routing is where many installations fail. Poorly routed cables chafe, corrode, and short out. Strategic routing protects your investment and ensures reliability.
Avoiding the Engine Compartment and Moisture-Prone Areas
Never run audio cables through the engine compartment unless necessary, since heat, vibration, and corrosive fumes damage them. If you must, use the most heat-resistant sheathing available.
Bilge areas collect corrosive saltwater. Keep cables above the bilge line so accumulating water won't contact your wiring.
Cabin areas below the waterline are prone to condensation. Run cables along the ceiling or high on walls; water drains down, so keeping cables high keeps them dry.
Cable Sheathing and Weather Protection Techniques
Cable sheathing comes in different materials: PVC works for most interior areas, while UV-resistant sheathing suits cables exposed to direct sunlight.
Flexible tubing protects cables from chafing in tight spaces, and spiral wrap adds protection without bulk. Tape sheathing ends to prevent water wicking inside.
Seal all cable entry points with marine sealant, around both the cable and the hole edges, to prevent water from entering the boat.
Testing, Troubleshooting, and Commissioning Your System
Before declaring your installation complete, test every connection. A few minutes now prevents hours of troubleshooting later.
Checking Connections and Verifying Proper Power Flow
Turn on the receiver and amplifier. Listen for audio from all speakers. If any speaker is silent, check its connections.
Use a multimeter to check voltage at the amplifier; it should show 12 volts.
Check the ground by measuring voltage between the amplifier chassis and the battery negative terminal. It should read zero; any voltage means a bad ground.
Test at full volume for a few minutes. Feel the amplifier case. It should be warm but not hot.
Diagnosing Noise, Interference, and Grounding Issues
Hum indicates a ground loop from multiple ground connections at different voltage potentials.
Whine or buzz usually comes from power supply noise.
Intermittent audio suggests loose connections that vibration briefly breaks. Check that every connection is tight, especially RCA connectors.
Radio interference or static can come from nearby electronics; some fish finders and radar systems broadcast on frequencies that interfere with audio. Moving cables away from them often solves the problem.
Common Installation Mistakes to Avoid
The most common mistake is undersizing power and ground cables to save money.
Another frequent error is poor grounding.
Mixing power and audio cables causes noise. These cables create electromagnetic fields that interfere with audio signals.
Many installers skip the fuse, but a fuse near the battery is a safety requirement.
Loose connections kill reliability.
Routing cables through the engine compartment damages them with heat and vibration. Plan your route to avoid hot areas.
Installing marine audio system wiring properly takes time and attention to detail, but the results are worth the effort. We carry tinned copper speaker wire, shielded RCA cables, and marine electrical safety equipment that meets industry standards, all designed to handle the harsh marine environment.
Frequently Asked Questions
What gauge wire should I use for a marine audio system?
Wire gauge depends on your amplifier's power output and the distance from the battery. For systems under 50 amps at distances up to 20 feet, 4 AWG power cable typically works. Longer runs or higher power demands require 2 AWG or thicker. Speaker wire varies: 12 AWG for short runs under 50 feet, 10 AWG for longer distances. Always use marine-grade tinned copper to resist corrosion. Consult your amplifier manual and use a wire gauge calculator if you're unsure.
How do you connect a marine stereo to a boat battery?
Run a heavy-gauge power cable from the positive battery terminal through an inline fuse holder to your amplifier or receiver. The fuse should be rated 10-15 feet from the battery. Connect a ground cable from the negative battery terminal or a clean metal ground point on the engine block. Use marine-grade cable with tinned copper conductors. Ensure all connections are crimped securely with marine-rated connectors and protected with cable sheathing to prevent corrosion and accidental shorts.
How do you protect marine audio wiring from corrosion?
Use only tinned copper cable and connectors, which naturally resist corrosion in the harsh marine environment. Cover exposed wiring with UV-resistant cable sheathing or split loom tubing. Secure cables with Adel clamps to prevent chafing and water pooling. Route cables away from the engine compartment and areas prone to standing water. Apply dielectric grease to all electrical connections to create a moisture barrier. Regularly inspect connections for white or blue-green corrosion buildup and clean with a wire brush if needed.
Do marine speakers need a separate amplifier?
Not always. Many marine stereo receivers have built-in amplifiers powerful enough for small speaker systems. However, if you want louder volume, deeper bass, or plan to add a subwoofer, a dedicated amplifier improves performance significantly. A separate amplifier allows you to use higher-quality RCA cables from the receiver and provides better power delivery to multiple speakers. If adding an amplifier, run a dedicated power cable from the battery with proper fusing for safety.
