

A marine battery does a lot of the hard work. It starts the engine, powers electronics, supports trolling motors, and keeps key systems running when they are needed out on the water, which is often the worst time for a problem. This guide is for boat owners, anglers, DIY maintenance fans, and commercial operators who want a simple way to protect battery life, avoid surprise failures, and keep the boat ready at the dock or launch ramp.
Below, the steps explain how to inspect, charge, clean, store, and monitor a marine battery the right way. You will also see what changes with different battery types, including flooded, AGM, and lithium, and yeah, that part really matters. A few small habits can often help a battery keep working properly for years. Research shows a well-kept lead-acid or AGM marine battery often lasts 3 to 6 years. With proper use, lithium can last 8 to 10+ years.
For a closer look at battery types before getting started, marine battery selection covers how to match battery chemistry to the way the boat is used. You can also check out Marine Battery Selection and Care: 2025 Buyer’s Guide for deeper comparisons and advice.
Before You Start
What you’ll need:
- Safety glasses and gloves
- A digital multimeter
- A marine smart charger or maintainer
- Distilled water, but only for serviceable flooded batteries
- Baking soda, clean water, a small brush, plus rags
- Light grease or petroleum jelly to protect the terminals
- Basic hand tools for tightening connections
- Your battery label or owner manual so you can confirm the battery type
Before you start, turn off the main battery switch, the engine, and any onboard electronics. Work in a ventilated area and keep the space clear while you go through everything on the list. Batteries can release gas, so don’t smoke or make sparks nearby, since that can cause ignition. It also helps to check the battery type first on the label or in the owner manual, just to make sure the rest of the process fits the battery you have.
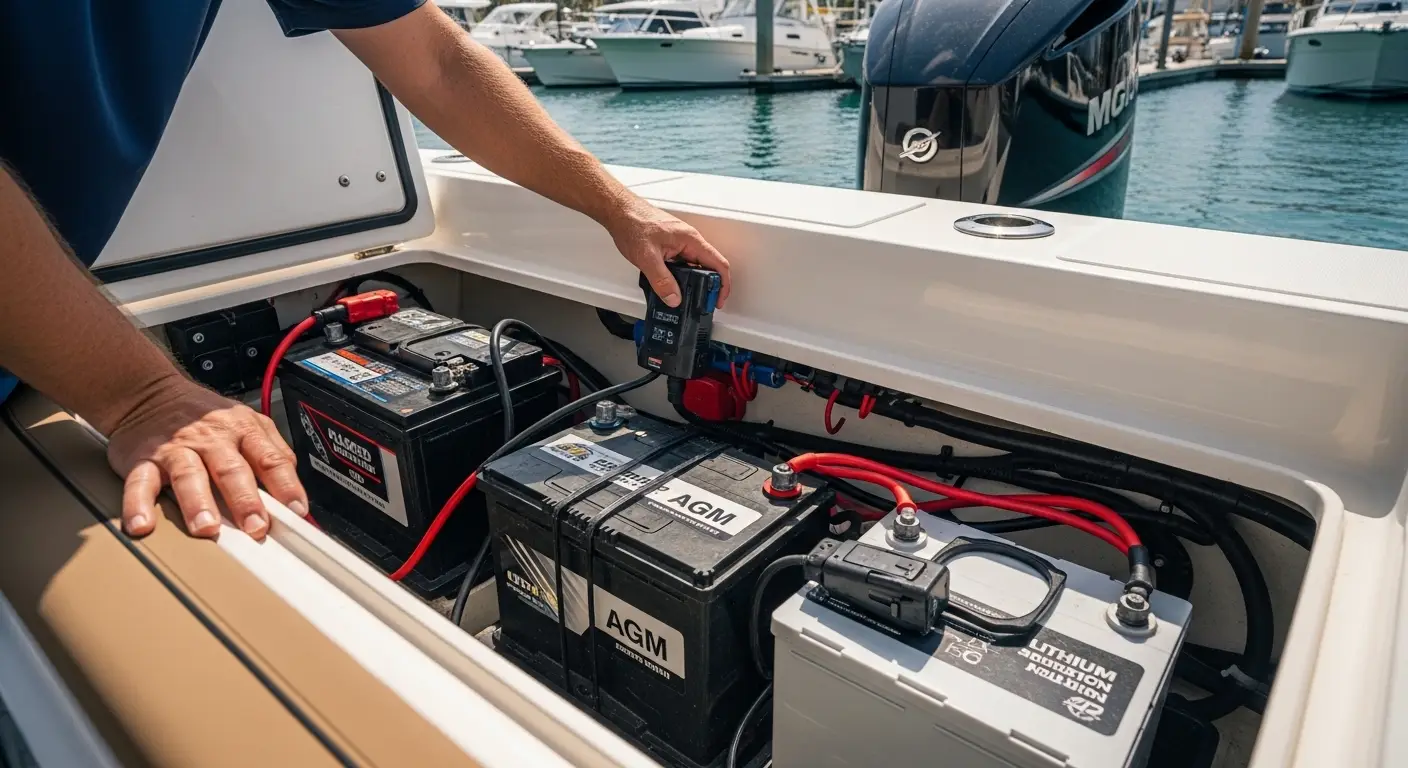
Step 1: Identify Your Marine Battery Type and Job
The first thing to do is read the label on each battery, because the type and intended job often decide how it should be charged and cared for. Common battery types include flooded lead-acid, AGM, gel, and lithium. Their jobs are usually starting, deep-cycle, or dual-purpose use. That difference is easy to miss, but it affects charging settings, maintenance needs, and how far each battery can safely be discharged.
For example, flooded batteries may need water checks now and then. AGM batteries are sealed, so they do not need water, though they still need the right charging profile. It sounds simple, but it still matters. Lithium batteries usually need less routine maintenance, but they also require a compatible charger and safe installation. As LithiumHub notes, “Lithium batteries require no maintenance and can withstand deep discharges (99% DOD) without damage.”
| Battery type | Routine care | Typical lifespan |
|---|---|---|
| Flooded lead-acid | Check water, clean terminals, charge promptly | 3-6 years |
| AGM | Clean terminals, charge correctly, avoid chronic undercharge | 3-6 years |
| Lithium | Use compatible charger, monitor system setup | 8-10+ years |
Deep-cycle batteries will probably matter most for many boaters. They make up about 48.1% of the marine battery market in 2025, which shows how common trolling motor and house loads have become. In most cases, that is because they are built for longer-running equipment rather than just engine starts. One mistake people often make is assuming every marine battery can be charged and maintained the same way, and that is usually where problems start.
Step 2: Recharge the Marine Battery Promptly After Every Use
After every trip, recharge your marine battery as soon as you can, because waiting too long often causes problems. For lead-acid and AGM batteries, the best time is within 12 to 24 hours after use. Charging during that time helps prevent sulfation, which matters a lot here since it’s one of the main reasons batteries slowly lose capacity over time.
For battery longevity, especially with lead acid batteries, get them on the charger within 12 to 24 hours of use.
Here is the process:
Connect the charger correctly
Match the charger to the battery chemistry and the bank size. It’s really pretty simple. If you’ve got a 12V battery, use the 12V setting, not a different one. And if you have more than one battery, choose the right bank on a multi-bank charger.
Use the proper mode
Set the charger to flooded, AGM, gel, or lithium mode exactly as the battery says, usually on the label. Don’t guess. The wrong setting can undercharge or overcharge the battery, and that’s bad news.
Check resting voltage
If a battery rests below 12.4V, it needs charging. It’s pretty simple. Just test it after the battery has sat a while with no load and no charging source.
Let the charger finish the cycle
Don’t unplug it early just because the battery seems “good enough.” Let it finish, even if it already looks done. It’s a simple step, but it matters: a full charge will usually help the battery last longer.
Another common mistake is using an automotive charger that’s too strong or not made for marine conditions. In most cases, a smart marine charger is the better choice, especially on boats with trolling motors, electronics, or multiple battery banks, where the setup can be a bit picky. There’s more help in this guide on Marine Battery Chargers for Multi‑Bank & Lithium Systems.
Step 3: Inspect the Marine Battery and Connections on a Schedule
Before every trip, do a quick visual check, it only takes a minute. Then, at least every 30 days, give it a more thorough inspection. That’s usually a good habit.
This helps catch small problems early, before they turn into a dead battery at the ramp or a failure offshore, which is probably the worst time for that. One useful way is to use this checklist:
Look for physical damage
A warped battery case is usually easy to spot, along with swelling, cracks, leaks, or broken hold-downs. If there’s any damage, you’ll likely want to replace the battery right away.
Check cable tightness
Battery cables should be snug, not loose, which is pretty simple. When a connection is loose, it can make starting harder, dim electronics, cause voltage drop, and often create heat too.
Look for corrosion
Blue, green, or white buildup on terminals usually means corrosion is starting, and that’s often the first sign. It also raises resistance, so charging usually drops.
Check battery security
Rough water vibration can damage the internal plates and shorten battery life. This usually happens more often than people expect, so it’s worth making sure the battery is strapped down tightly. It’s a simple check, but often a helpful one.
BoatUS technical guidance also says batteries usually last longer when they stay clean, fully charged, and stored properly. On the water, plenty of “bad battery” complaints actually come from loose connections or corrosion, which can be pretty frustrating.
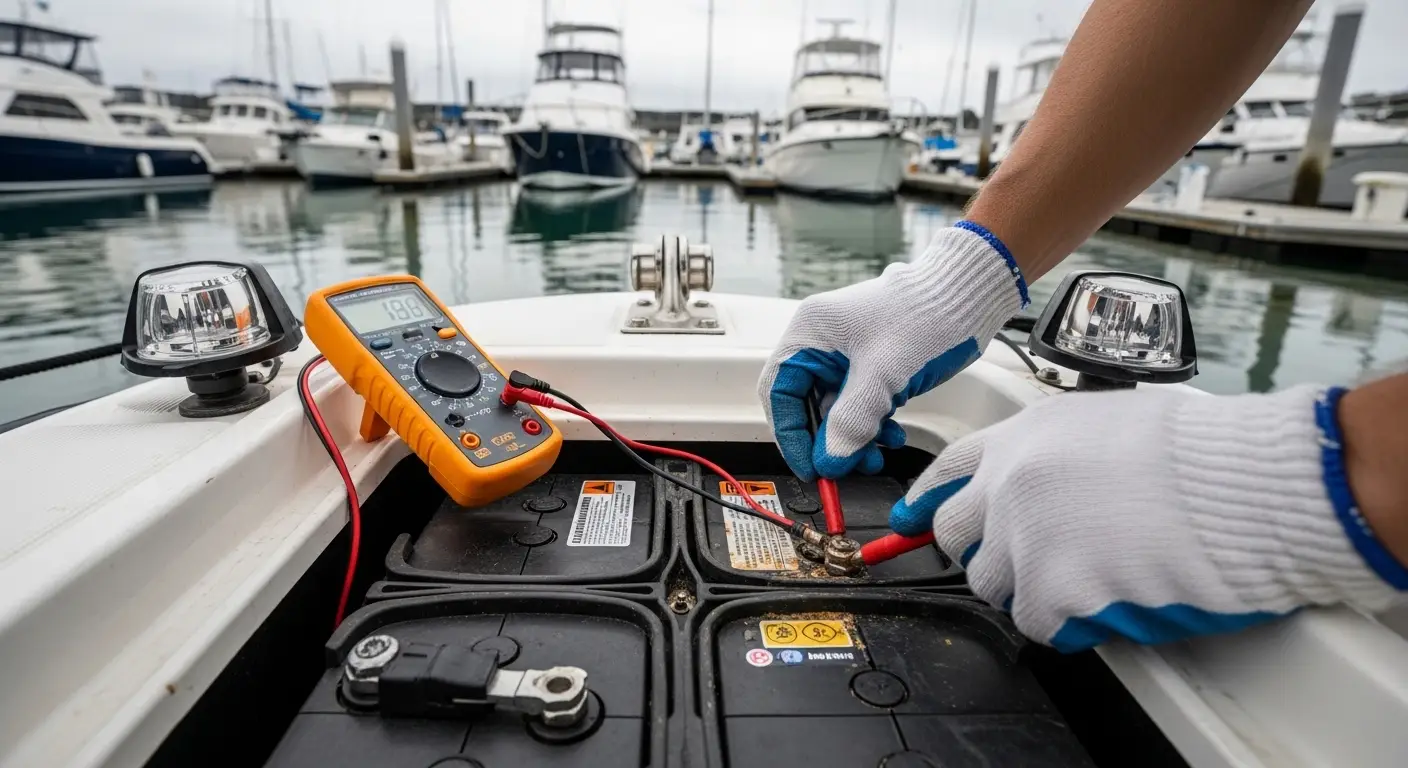
Another good habit is checking voltage every 3 months, even when the boat seems fine. That makes it easier to notice a pattern over time. If the resting voltage starts dropping faster than normal, the battery may be aging, or a hidden load could be draining it.
You can learn more in Marine Battery Lifespan: What Really Shortens It and How to Prevent Early Failure.
Step 4: Clean Marine Battery Terminals and Protect Them From Corrosion
If you notice corrosion, clean it up right away since it’s a common marine battery issue. It’s also often one of the easiest fixes, so taking care of it early is usually pretty simple.
Mix a simple cleaner
Mix baking soda with water; it’s simple. Usually, this works as a paste or, sometimes, a lighter solution.
Disconnect cables safely
Take off the negative cable first, since that’s usually safer. Then remove the positive one. This helps reduce accidental shorts.
Scrub the terminals
Use a small brush to clean corrosion from the terminals and cable ends; it really helps. Be careful, and mainly keep the mixture out of the battery cells and away from nearby electrical parts.
Dry and reconnect
Wipe everything dry first (I think it helps). Then reconnect the positive cable, then attach the negative.
Add protection
Apply a thin coat of light grease or petroleum jelly to the terminals. This usually helps slow down future corrosion.
One common mistake is cleaning only the top and missing the cable ends underneath, since they’re easy to miss. Corrosion often hides there. Another mistake is reconnecting the cables in the wrong order, which can happen quickly, so staying consistent and working carefully will likely help avoid both problems.
Step 5: Check Water Levels on Flooded Marine Batteries Only
If you’ve got a serviceable flooded marine battery, it’s a good idea to check the electrolyte level often as part of regular upkeep. But not with AGM, gel, or lithium batteries, they’re different. This applies only to flooded batteries.
Open the vent caps carefully
Only do this once the charger is off, seriously. Also make sure the area is well ventilated, ideally with windows open.
Look at the plates
The electrolyte should cover the plates. If they’re exposed, the battery can often get damaged, which is clearly not good news.
Top up with distilled water only
Add just enough distilled water to reach the proper mark, or just above the plates if there is no mark. Do not overfill. That is usually all you need to do.
Never use tap water
Tap water can add minerals, which usually isn’t good, and I think it can hurt battery life.
Don’t add acid unless the manufacturer specifically says to
For normal maintenance, the main thing is simple: add distilled water, not acid.
It’s an easy beginner step, but people often miss it, especially if they’re new. That usually happens more in hot months, when water tends to evaporate more quickly.
Step 6: Store the Marine Battery the Right Way During Off-Season Downtime
Good storage is a big part of marine battery maintenance, especially during winter layup or long breaks between trips. The battery should be stored fully charged in a cool, dry place like a garage shelf or storage compartment that stays clear of damp air, and that detail matters more than many people think. Keep it out of direct sun and away from extreme heat too. Heat usually speeds up battery wear over time, while cold can also reduce performance, especially when a battery sits discharged for too long.
If the setup allows it, turn off parasitic loads or disconnect the battery before storage. Then, if the manufacturer recommends it, connect a suitable maintainer or smart charger. It is a small step, but it can really help seasonal boats that sit unused for months at a time, which is pretty common.
Storage planning matters even more with recent marine trends. Battery-powered vessels are growing fast, with 944 battery-powered ships operating worldwide and 451 in development. Even on a small fishing boat, that wider shift is getting easier to notice as marine electrical systems become more advanced. In that context, battery care usually matters even more.
If the setup is more complex, the next useful step is learning about the switch and monitoring side of the system. That was covered here: Marine Battery Switches: Installation, Wiring Safety, and Smart Monitoring Upgrades.
Step 7: Follow Safe Marine Battery Use Rules and Know When to Replace It
A marine battery should not be run until it completely fails. It is better to watch for warning signs and replace it before it leaves you stuck on the water, which is often the worst time for battery trouble.
Replace it, or do some more testing, if any of these show up:
- Hard starting
- Dim lights, weak electronics, or both
- A swollen case
- Leaks or a strong odor
- Repeated low voltage after charging
- Fast discharge under normal loads
A spark test across the terminals is not a good idea. Use a multimeter or a proper load test instead. If you switch to lithium, check charger compatibility, battery management systems, and current marine safety practices such as ABYC E-13 guidance. For many DIY boaters, one easy-to-miss issue is changing battery chemistry before making sure the charger, wiring, and switch gear can handle it. Checking those items first will often help prevent bigger problems later.
You can also explore Marine Battery Care: Advanced Techniques for 2025 for more advanced maintenance insights.
Frequently Asked Questions
How often should you charge a marine battery?
You should recharge it after every use. For lead-acid batteries, the best practice is within 12 to 24 hours after the trip. Letting it sit partly discharged can shorten battery life.
What voltage is too low for a marine battery?
A resting voltage below 12.4V is a good sign the battery needs charging. If it keeps dropping quickly after a full charge, the battery may be aging or something on the boat may be drawing power when it should not.
Can you leave a marine battery on a trickle charger all winter?
You can leave it on a smart maintainer designed for your battery type if the manufacturer allows it. Avoid old-style chargers that can overcharge the battery during long storage periods.
How do you clean corrosion off marine battery terminals?
Disconnect the negative cable first, then the positive. Clean the terminals with a baking soda and water mixture, dry them fully, reconnect positive first and negative last, then add a light protective coating.
Where can you find the right marine battery charger or maintenance parts?
A marine-focused parts source like First Choice Marine can help you compare chargers, electrical accessories, and routine maintenance items that fit common boat setups. The key is choosing products that match your battery chemistry and how many batteries are on board.
What if you are not sure which marine battery type is right for your boat?
Start with your engine and accessory load, then match the battery to the job. Resources from First Choice Marine and detailed buyer guides can help you compare flooded, AGM, and lithium options without guessing.
Keep Your Boat Ready for the Next Trip
Marine battery maintenance isn’t hard, but it does need regular attention. Start by figuring out what type of battery you have, then recharge it as soon as it needs it. A monthly check can help catch small problems early, like corrosion that needs to be cleaned off, flooded batteries that need distilled water, or storage steps that matter in the off-season. These simple habits can help protect battery life, improve reliability, and lower the chance of electrical trouble when you’re fishing, cruising, or trying to get back to the dock safely.
One easy sign that things are going well is when the battery charges fully, holds voltage, powers your systems reliably, and shows no swelling, leaks, or corrosion buildup. If that’s what you’re seeing, your routine is probably working.
It also helps to put the schedule on a maintenance calendar. Add a monthly inspection, a quarterly voltage check, and a pre-season charger test, since that’s easy to miss. If you use multiple batteries for house loads, electronics, or trolling motors, it’s also worth checking the full charging and switching setup. A little attention now can often save a very long day on the water later.