


Table of Contents
- Safety First: Disconnecting Power and Prepping for Propeller Work
- How to Remove a Boat Propeller: Tools and Step-by-Step Process
- Best Tools for Propeller Maintenance: Your DIY Checklist
- Identifying Damage: Nicks, Dings, Cracks, and Beyond
- DIY Boat Propeller Repair Techniques: What You Can Fix at Home
- When to Replace vs Repair a Boat Prop: A Cost-Benefit Analysis
- Post-Repair Performance Testing and Environmental Disposal
- Frequently Asked Questions
Last Updated: September 28, 2026
Safety First: Disconnecting Power and Prepping for Propeller Work
The most important step in any diy boat propeller repair guide 2026 happens before you touch a single tool: disconnect the power. A spinning prop can cause severe injury, and the engine must be completely off and the battery isolated before you get near the lower unit.
Here's how to prep safely:
- Turn off the engine and remove the key
- Disconnect the negative battery terminal
- Shift the engine into neutral
- Wait for the prop to stop completely
- Tie off the boat securely at the dock
Never work on a propeller in the water with the engine connected. Even a bump start can engage the drive.
How to Remove a Boat Propeller: Tools and Step-by-Step Process
Removing a boat propeller takes about 15 minutes with the right tools. You'll need a torque wrench, a crescent wrench, a socket set, and a replacement cotter pin on hand.
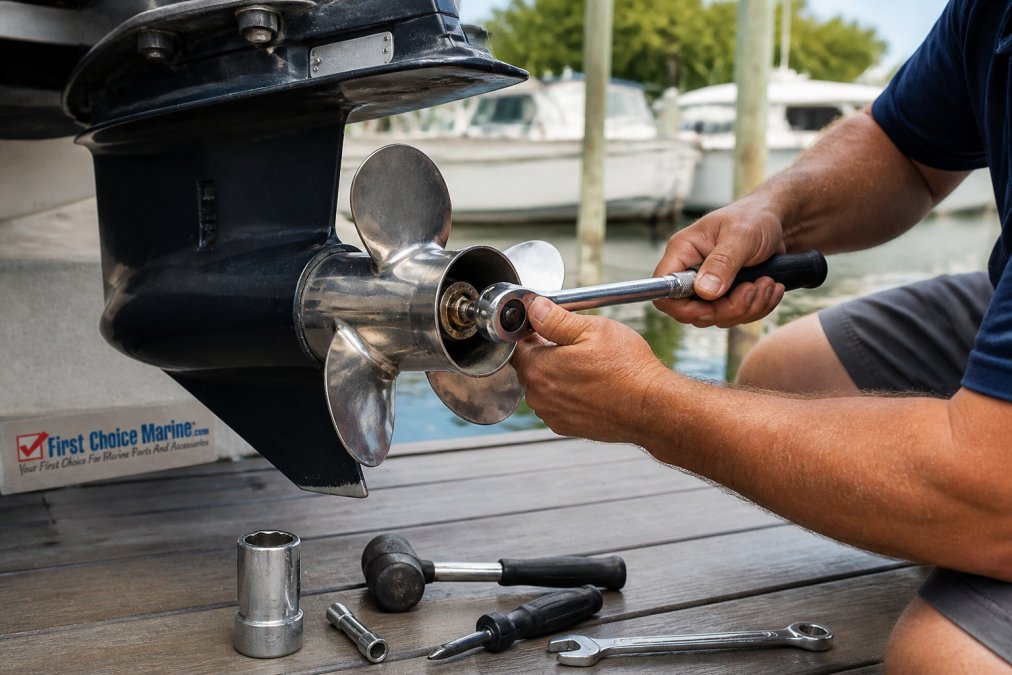
The process follows a set order.
- Straighten and remove the cotter pin
- Hold the prop blade and loosen the propeller nut
- Slide off the thrust washer and prop
- Check the hub kit and spline for wear
- Note the thrust hub position before cleaning
Best Tools for Propeller Maintenance: Your DIY Checklist
The best tools for propeller maintenance fit in one small bag and cost far less than a single shop visit. First Choice Marine's 2026 tool list covers the essentials every DIY boater should own (First Choice Marine essential boat repair tools).
| Tool | Purpose | Why It Matters |
|---|---|---|
| Torque wrench | Tighten the prop nut | Prevents over- or under-torquing |
| Crescent wrench | Hold the nut | Fits most prop sizes |
| Socket set | Remove the nut | Grips rounded hardware |
| Cotter pin set | Secure the nut | Cheap insurance against spin-off |
| Prop puller | Free stuck props | Avoids prying damage |
| Wire brush | Clean the spline | Stops corrosion buildup |
| Marine grease | Lube the shaft | Blocks electrolysis |
Identifying Damage: Nicks, Dings, Cracks, and Beyond
Damage falls into two clear groups: DIY-friendly and professional-only. Nicks, dings, and minor bends on aluminum alloy props are fair game for home repair. Cracks, deep gouges, and bent blades on stainless steel need a shop.
Check for these signs:
- Nicks and dings on the leading edge
- Cracks near the hub or blade root
- Bent or cupped blades that break the pitch line
- Cavitation burn (pitting from air bubbles)
- Ventilation (slipping from surface air)
- Spun hub (engine revs, boat doesn't move)
DIY Boat Propeller Repair Techniques: What You Can Fix at Home
Home repairs work best on aluminum props with light damage. File nicks smooth, straighten minor bends, and touch up blade geometry with hand tools. Boat propeller repair at this level is safe, cheap, and satisfying. But the technique changes completely depending on what the prop is made of, and most guides skip that distinction. Aluminum and stainless steel behave differently under heat and stress, so the same repair that saves an aluminum prop can ruin a stainless one.
Aluminum Props: The DIY-Friendly Metal
Aluminum alloy is soft, ductile, and forgiving. It bends before it cracks, and it can be worked with hand tools and modest heat. This is the material where DIY repair genuinely makes sense.
What you can do yourself on aluminum:
WEST SYSTEM Fiberglass Boat Repair and →
- File nicks and dings flush with a flat file, working the trailing edge toward the leading edge so you don't round off the cutting edge
- Smooth leading edges with 220-grit wet sandpaper, then finish with 400-grit to remove file marks
- Straighten minor blade bends (roughly 1/8 inch or less of deflection) in a padded vise, applying slow pressure and checking the pitch line against a straightedge
- Replace the hub kit and thrust washer
- Swap a spun rubber hub insert
Stainless Steel Props: Why Most Repairs Belong in a Shop
Stainless steel is roughly three times stronger than aluminum and resists cavitation erosion far better, but that strength is exactly why home repair goes wrong. Stainless work-hardens aggressively, and bending it cold can introduce micro-cracks that only show up later as a thrown blade.
What Stays in the Shop, Regardless of Material
Welding, cup adjustments, and pitch changes are shop work. Don't attempt them without a propeller shop's tooling. A pitch change of even one inch alters rpm by roughly 150 to 200 at wide-open throttle, and getting it wrong means the engine either over-revs or lugs. Cup adjustments change how the blade loads water and are measured in thousandths of an inch. These are not file-and-eyeball jobs.
When to Replace vs Repair a Boat Prop: A Cost-Benefit Analysis
Repair wins when damage is cosmetic; replace when the prop is structurally compromised. For minor nicks and dings, a $35 hub or a filing job beats a new prop. For cracks, deep bends, or a bent shaft, replacement is cheaper than the risk. That's the short answer. The useful answer is a framework you can run against your own prop, because the break-even point moves depending on material, prop size, and how much of the work you do yourself.
The Four Numbers That Decide It
Run these before you spend anything:
- Replacement cost, what a new prop of the same pitch, diameter, and material costs for your engine.
- Repair quote, what a local prop shop charges to straighten, weld, or re-pitch. Ask specifically whether the quote includes rebalancing, because an unbalanced prop causes vibration that wears the shaft seal and lower-unit bearings.
- Your time and tool cost, if the repair needs a tool you don't own (prop puller, pitch block, torque wrench in the correct range), add that to the repair side of the ledger. A tool you'll use once may not pay for itself.
- Downtime cost, a shop repair may take days or weeks in season. A replacement you can bolt on today has real value if you're losing water time.
The Break-Even Rule of Thumb
Worked examples:
- Minor nick or ding, aluminum: Repair. Cost is time plus a file. No shop visit needed.
- Spun hub: Replace the hub insert. Around $34 for the Solas part above. This is almost always cheaper than a new prop.
- Bent blade, aluminum, repairable: Get a shop quote. If it's under half the price of a new aluminum prop, repair. If not, replace.
- Cracked or bent stainless: Replace. Welding rarely restores full strength, and a failed blade at speed damages the lower unit.
- Bent propeller shaft: Professional repair only. This is not a prop problem, and no prop repair fixes it.
The Hidden Costs of a Bad Repair
A repair that looks fine on the trailer can cost far more than a new prop. Vibration from an unbalanced blade hammers the shaft seal, the carrier bearing, and the gearcase. Cavitation burn from a blade whose edge geometry is off erodes the blade further and can pit the gearcase housing. In the worst case, a blade that fails at speed takes the lower unit with it.
Post-Repair Performance Testing and Environmental Disposal
Test the prop on the water before you trust it. Run the boat through the full rpm range and watch for vibration, cavitation, or rpm that won't reach spec. Any shake means something's off, so pull it and recheck.
Your post-repair checklist:
- Run at idle, mid-range, and wide-open throttle
- Listen for new vibration or noise
- Confirm the rpm range matches spec
- Check the hub and nut after the first run
- Re-torque the prop nut to spec
Frequently Asked Questions
How tight should I tighten my boat prop?
Tighten the propeller nut to the torque specification in your engine's service manual, typically 50-80 ft-lbs for many outboards. Use a calibrated torque wrench. Overtightening can damage the hub or shaft, while undertightening risks the prop spinning off. Always install a new cotter pin or tab washer after torquing.
Can you repair a bent boat propeller at home?
Minor bends in aluminum props can sometimes be straightened with a mallet and wood block, but stainless steel requires specialized tools. Severe bends, cracks, or blade distortion should be left to a professional. DIY straightening without proper equipment can weaken the blade and lead to failure.
What are the signs that a boat propeller needs repair?
Watch for vibration, reduced top speed, RPM changes, or visible nicks, dings, and cracks. A spun hub will cause the engine to rev without moving the boat. Inspect the prop regularly, especially after hitting debris or running in shallow water.
How much does it cost to repair a boat propeller?
Professional repair typically costs $50-$150 for minor damage, depending on material and extent. DIY repair can be under $50 if you already own tools. However, if the prop is severely damaged, replacement may be more cost-effective. Always compare repair vs replacement costs.
