

Good boat lighting makes night fishing safer, docking easier, and long hours on the water much more comfortable. Still, many boat owners worry about battery drain once they start adding lights. That concern makes sense. A bad layout, old bulbs, or weak marine electrical wiring can leave you with dim lights before the night is done. In the worst case, the battery is too low to start the engine the next morning.
The good news is that smart boat lighting does not have to use too much power. The right light types, a good wiring plan, and proper charging support let you add deck lights, spreader lights, courtesy lights, and more without putting too much strain on the system. It helps to plan the boat in zones, measure current draw carefully, protect each circuit, and keep critical loads separate from comfort lighting.
This guide covers planning the layout, choosing efficient fixtures, sizing circuits, and backing everything up with the right battery strategy. If you are a DIY boater, a fishing enthusiast, or a small commercial operator, it is here to help you make better choices before cutting holes or running wire.
Start With a Simple Boat Lighting Plan
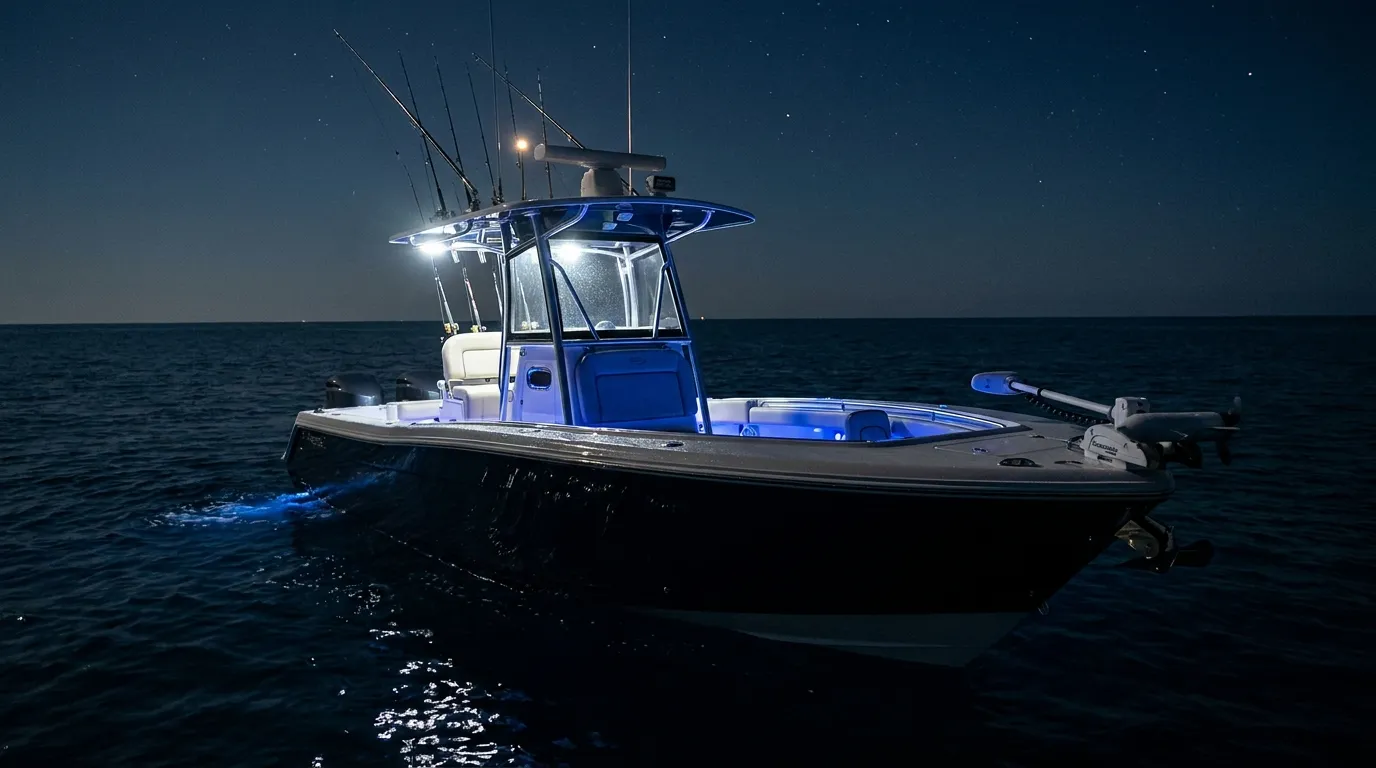
Before you buy anything, map out what each light needs to do. Deck lights are there for rigging, cleaning, and moving around the boat, so they need to help with the practical work. Spreader lights cast a wide beam across the cockpit or work area. Courtesy lights work best as a soft glow on steps, under gunwales, and inside compartments. Since each one has a different job, the layout should be based on function first, not looks.
Ted Sensenbrenner from Waterway Guide and BoatUS said it simply:
First, you want to start with LED lights because they draw less power
The numbers back that up. LED marine lights can use up to 85% less power than halogen, and a 15-watt LED can produce light similar to an 85-watt halogen bulb. For battery life, that makes a clear difference.
| Lighting Type | Typical Power Use | Expected Life |
|---|---|---|
| LED marine fixture | Up to 85% less than halogen | 15,000 to 50,000 hours |
| LED flood light | Low draw for high output | 50,000 to 100,000 hours |
| Halogen fixture | Much higher draw | 1,000 to 2,000 hours |
In everyday use, that means useful light can stay on longer without putting as much strain on the battery bank. There is also less heat and fewer bulb changes, which makes things easier. For placement, spreader lights should be mounted high and angled down to reduce glare. Deck lights belong where hands are doing the work. Courtesy lights should stay low and soft so they help with footing without ruining night vision.
Calculate Amp Draw Before You Install Anything
A clean layout is only half the job. The other half is building a power budget, and many boat lighting upgrades start causing problems right there. Owners add a few lights here and there, then end up wondering why the house battery drops faster than they expected.
A good move is to add up the amperage of every light and accessory that could be running at the same time. Soundings Online says that four halogen cabin lights can draw about 5 amps each. That means about 20 amps from only four fixtures. Add an anchor light, music, basic nav electronics, and a few other everyday loads, and the battery draw can climb to around 30 amps. It adds up faster than most people expect.
Take a setup like this: spreader lights at 1.5 amps each, deck lights at 1 amp each, and six courtesy lights at 0.2 amps each. That all sounds pretty reasonable. Even so, LEDs only keep the lighting load manageable if the rest of the system stays under control. Leave older halogen work lights in the mix, and your reserve can disappear a lot faster.
For more examples of how to balance power usage, see Battery Chargers for Boats: How to Size and Install for Long Life.
A simple load planning method
- Start by listing every new light.
- Write down the rated amps or watts for each one.
- If needed, convert watts to amps with
amps = watts ÷ volts. - Add up the lights that will be running at the same time.
- Compare that total with your battery capacity and the power you usually use overnight.
A DC current meter at the panel is very handy because it shows the real draw instead of making you guess. That becomes even more useful if the boat already runs fish finders, pumps, radios, and livewell loads, since those can add up quickly. On a busy boat, they may use more power than you expect. Charging support after adding new loads is covered here: Battery Chargers for Boats: How to Size and Install for Long Life.
Use Marine Electrical Wiring That Matches the Boat Lighting Environment
Even the best fixtures can fail if the wiring is poor. On a boat, marine electrical wiring needs to hold up against vibration, moisture, heat, and corrosion (that’s just how it is out there). At the dock, a light might seem fine even with a weak connection. Once you’re offshore and the boat starts pounding through chop, though, that same setup can stop working in a hurry (and yeah, fast really does mean fast).
Ted Sensenbrenner also warned:
If 12-volt outlets are used, the wiring and outlets must be protected by fuses or breakers properly sized to protect the wires supplying power to the outlet from carrying more current than they can safely handle. Any wiring connections should be clean and free from corrosion.
That standard applies to lights too. Use marine-grade tinned copper wire, heat-shrink connectors, waterproof fixture leads, and sealed switches anywhere spray is likely. Support wires so they don’t chafe, and keep them away from sharp edges and hot engine parts. If possible, label each lighting circuit so it’s easier to know what’s what later.
Common wiring mistakes to avoid
- Using automotive wire instead of marine-grade wire
- Adding new lights to an old circuit that is already overloaded
- Skipping fuse protection near the power source
- Using poor grounds or dirty connection points
- Putting high-draw spreader lights and low-draw courtesy lights on one switch just because it seems easier
Sherman, a marine electrical expert quoted by Soundings Online, said it well:
Safety is paramount, so I value properly installed batteries and properly rated and positioned circuit over-current protection.
If you want to improve your full electrical setup without adding extra hassle, Marine Electrical System Maintenance: Complete Boater Guide is a useful next read.
Protect Your Starting Power With Better Battery Planning
Lighting should usually run from the house side, not the engine starting battery. That one choice can prevent a lot of problems. If house loads and engine loads are connected, comfort items like lights can draw power from the battery you may need most to start the engine.
Klockars, quoted by Soundings Online, said it clearly:
The house batteries and the engine batteries should always be separate.
That applies to both recreational and commercial boaters. A separate house battery bank lets deck and courtesy lighting run without putting engine start power at risk. A battery switch gives you more control over how charging works between banks. An automatic charging relay or a voltage-sensitive relay can also help, especially if you want a setup that is easier to manage.
Charger size matters too. On boats around 30 to 45 feet, a practical recommendation is a multibank charger with at least 20 amps of output. Boats with heavier electrical demands may do better with a three-bank, 30-amp charger with a remote status display. If you are comparing different options, that topic is covered in Marine Battery Chargers for Multi‑Bank & Lithium Systems.
For many owners, smart boat lighting connects directly to battery chargers for boats. More efficient lights reduce overall demand. Proper charging then replaces the power used and helps batteries stay in better shape over time, which can mean fewer problems later.
Build Boat Lighting in Zones for Better Control
Zoning is one of the easiest ways to cut power use without giving up the light a boat really needs. Instead of putting every fixture on one switch, split lights by job. Deck work lights can be on one circuit, courtesy lights on another, and spreader lights should stay separate too. That way, only the lights needed at that moment are turned on.
It’s easy to picture this on a fishing boat. Bright spreader lights may make sense while cleaning fish at the dock, but before dawn, dim courtesy lights are often enough to move around safely. A cruiser has its own pattern: cockpit lights for evenings when people are gathered outside, then low blue step lights during the night. Zoned lighting also makes issues easier to find. If one fixture fails, the whole system does not go dark with it.
Current marine standards matter here too. In 2025, ABYC updated standards with wide changes across onboard systems. As Brian Goodwin of ABYC said, “The newest revisions touch just about every corner of the boat: electrical, fuel, water systems, and even seat structures,”. That means retrofit work should follow current proven methods instead of older dockside habits.
The market is moving the same way. Marine lighting estimates put the market at USD 417.66 million in 2026, with growth continuing beyond that. LED already holds a large share, roughly 46% to 57.5% depending on the forecast. So the shift is already underway, and design, durability, and efficiency are where much of that movement is centered.
A Practical Installation Checklist for DIY Boaters
Ready to install? Slow down and handle the prep first, it matters. Measure the runs, check the battery condition, and inspect the panel before mounting any fixtures. Test-fit everything as you go. You’ll also notice quickly if spreader lights are aimed where they can blind the helm. Make sure courtesy lights won’t reflect too harshly off white gelcoat.
Quick checklist
- Pick LED fixtures rated for marine use
- Divide lighting into work zones and low-level courtesy areas
- Match the wire size and fuse to each circuit
- Use waterproof connectors and tinned copper wire
- Run lighting from the house bank when possible
- After adding new loads, check charger capacity
- Test for voltage drop with the lights turned on
- Seal penetrations properly so they do not leak
A good parts source helps more than people expect. Many boat owners use First Choice Marine to compare marine maintenance and rigging parts, because it is easier to plan when lighting, battery, and electrical items are all in one place, and that can save time.
Frequently Asked Questions
How many boat lights can I add without draining my battery?
It depends on the total amp draw, how long the lights run, and the size and health of your battery bank. The safest approach is to add the current draw of all lights that may run at once and compare that with your normal overnight load.
Are LED lights really worth it on a boat?
Yes. LEDs use far less power than halogen, last much longer, and handle vibration and moisture better. For most boat lighting upgrades, they are the easiest way to cut battery drain right away.
Do deck lights and courtesy lights need separate switches?
In most cases, yes. Separate switches let you run only the lights you need, which saves power and gives better control at night. It also makes troubleshooting much easier later.
What size charger should I use after upgrading my boat lighting?
That depends on battery bank size and total onboard loads, not just the lights alone. If your boat has growing house loads, articles and product categories from First Choice Marine can help you compare battery chargers for boats and related electrical gear in one place.
Can I use automotive wire for marine electrical wiring?
It is not a good idea. Marine-grade tinned copper wire and sealed connectors resist corrosion much better and hold up in wet, salty, vibrating conditions. That makes the system safer and more reliable.
What is the biggest mistake people make with boat lighting upgrades?
The biggest mistake is focusing only on the light fixture and ignoring the full system. A good setup needs the right wire size, proper fuse protection, clean connections, and a battery plan that protects starting power.
Put Your Boat Lighting Plan to Work
Better boat lighting is one of the most useful upgrades for a simple reason. It can help with safety, make night fishing easier, and let everyone move around the boat with more confidence, which matters fast after dark. The real benefit comes from treating lighting as part of the full electrical system instead of adding a few lights and just hoping they work well.
Start with LEDs, then plan your lighting by zone and figure out the amp draw before you buy anything. That extra step can save a lot of problems later. Use proper marine electrical wiring, along with fuse protection and connections that resist corrosion. If possible, keep the house and engine batteries separate, and make sure the charger can handle the added load.
When it is done right, you can end up with bright deck lights, useful spreader lights, soft courtesy lights, and a setup that works well without the constant worry of a dead battery. A well-planned setup is more reliable than guesswork, especially during a late return, a pre-dawn launch, or dockside cleanup in low light.
For more insights into future innovations in lighting and power systems, visit 2026 Trends in Boat Lighting: Embracing Advanced LED Systems for Enhanced Visibility.