


Electric trolling motors have improved a lot. By 2026, most are quieter, stronger, and packed with smarter features than older models, and you can usually feel that difference once you’re on the water. Even so, a good motor can still disappoint if it’s installed poorly. Many boaters buy a reliable unit, rush the setup, and only notice something feels wrong after they start using it. That kind of frustration can linger and take away from the experience. This guide aims to help you skip wasted time and avoid that uneasy feeling that something isn’t set up right.
The goal is to explain electric trolling motors in plain, everyday terms, without drowning anyone in technical talk. It looks at how modern systems work and how to plan a tidy installation from beginning to end, including the tools you’ll need. Wiring, batteries, common mistakes, and the 2026 trends that really matter are all covered. No overthinking, just clear explanations that make sense in real-world use.
This article is for weekend anglers and DIY boat owners, and charter captains too. You don’t need to be an electrician or marine tech. Clear steps, good habits, and a little patience usually make installation go much smoother.
Why Electric Trolling Motors Matter More Than Ever
What’s most noticeable right now is how much control these motors give back to boaters. Electric trolling motors usually aren’t optional gear anymore, they’re close to essential for many setups, and that shift happened faster than expected. Spot‑lock and GPS control have changed fishing and on‑water work, especially in tight, precision‑heavy situations where quiet operation often makes the difference. This is a real change, and it helps explain why the market keeps growing so quickly.
In 2024, the electric trolling motor market reached USD 1.51 billion and continues to climb at a steady pace. Recreational fishing and eco‑friendly boating rules often drive demand at the same time. Smarter marine electronics help smooth that shift, so for you, the move usually feels natural rather than forced.
| Metric | Value | Year |
|---|---|---|
| Global market size | USD 1.51 billion | 2024 |
| Projected market size | USD 2.93 billion | 2035 |
| Forecast growth rate | 6.22% CAGR | 2025, 2035 |
| North America market share | About 55% | 2025 |
This growth is linked to better technology. GPS anchoring depends on precise setup, and brushless motors with lithium batteries need stronger wiring and proper protection, guesswork rarely works here. Installation now often affects real‑world performance as much as the motor itself, sometimes even more.
The growth of this market is primarily driven by the increasing popularity of recreational fishing activities around the world, coupled with advancements in marine technology.
When installation is sloppy, those same upgrades can turn into headaches, like spot‑lock struggling to hold position when you need it most.
Planning Your Electric Trolling Motors Installation the Right Way
The most important work often happens before any drilling begins. Taking a little time to plan can save you time, money, and frustration later, plus a few easy-to-avoid headaches. A good place to start is with the basics: measure the bow height and look over the deck to be sure it’s solid. It also helps to confirm the right shaft length early, since that choice affects everything else. If it’s too short, the prop can lift out of the water. If it’s too long, it may drag and waste power without much benefit.
Most manufacturers recommend adding about 20 inches to your bow height. That extra length usually keeps the prop underwater when waves pick up, which happens often. It’s also smart to think about how the motor folds and stores. When planned well, it won’t stick too far past the bow or block access up front, a detail that’s easy to miss.
Boat structure matters more than many people expect, especially with newer 2026 motors. These models are heavier and often need backing plates. Without enough support, aluminum and fiberglass decks can crack over time, mainly around mounting points. Marine-grade plates spread the load and help protect the hull.
Electrical planning matters too. Start by choosing the voltage. Many boats still use 12V systems, but bigger motors often need 24V or 36V. Higher voltage usually runs more efficiently, but it also means thicker wiring and more batteries. For example, moving up to 24V can make sense if the extra weight and wiring already fit your setup.
If you want more detail, this topic is also covered in our guide on Bow Mount Trolling Motors: Installation, Performance Tuning & Maintenance.

Step-by-Step Best Practices for Electric Trolling Motors Installation
With planning finished, installation usually goes more smoothly when it’s handled in calm, clear steps. Rushing is often when mistakes slip in, and that’s how small problems turn into bigger ones. A smart way to start is by dry‑fitting the motor. Place it on the bow and slowly move it through the stow and deploy motion. This lets you see how it really moves in the space you have. Take your time and watch how it clears rails, lights, and nearby hardware, because even light rubbing can cause issues later on.
Before drilling anything, take care to mark every hole. This is one of those steps where slowing down really helps. Drill carefully and control the depth, since holes can’t be undone. Sealing each hole with marine sealant helps keep water out of the deck core. Using stainless or marine‑grade fasteners also helps avoid problems over time.
Wiring causes the most frustration during installs, in my view, so it deserves extra attention. Picking the right wire gauge from the start matters. For 24V and 36V systems, 6 to 8 AWG wire is typical. Smaller wire can lead to heat and voltage drop later. Protection matters too. A manual reset circuit breaker placed within seven inches of the battery helps protect the system.
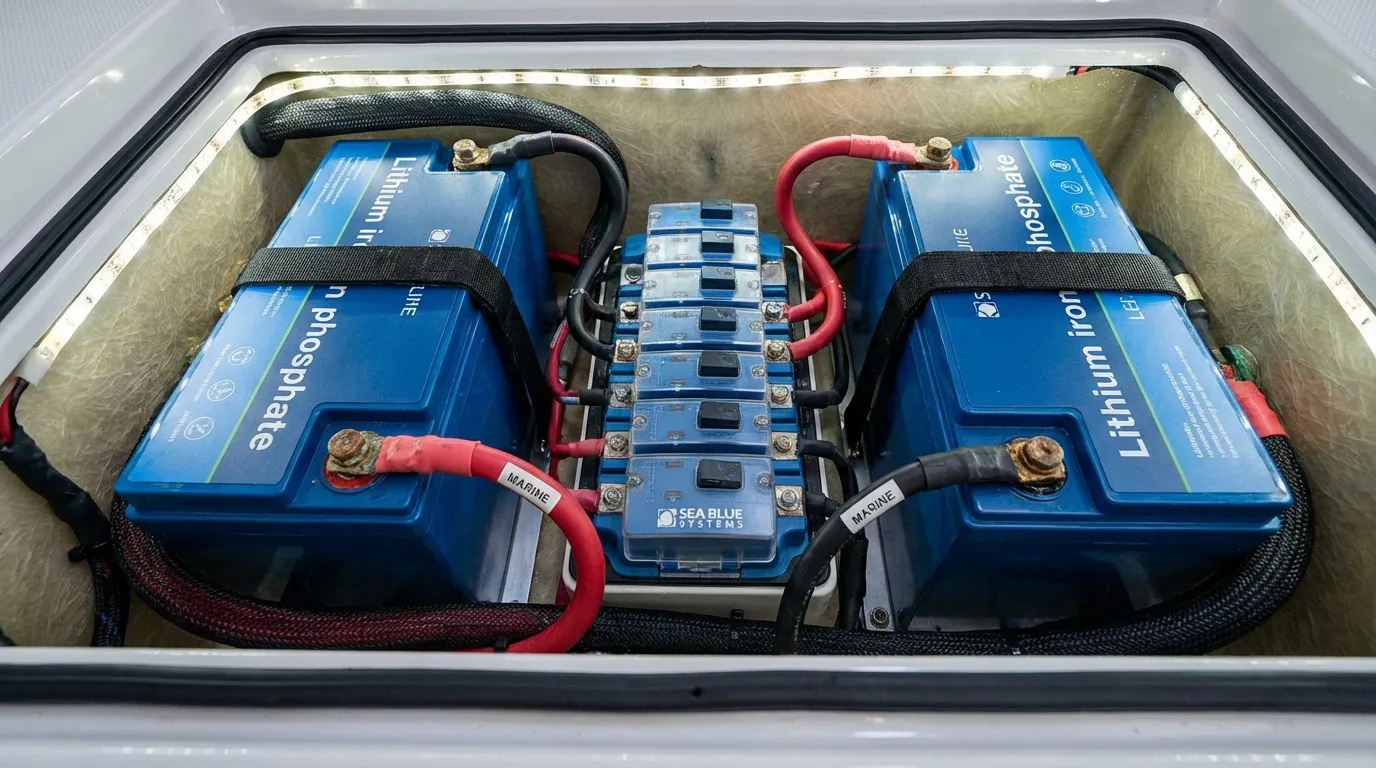
Battery setup matters as well. Batteries should sit in trays and be strapped down tight, since vibration can shorten battery life. When upgrading batteries, slowing down to understand the options helps. This overview of electric trolling motors and modern systems explains how newer motors work with updated power setups.
Before heading out, test everything. Turn the motor side to side, run it at low and high speeds, and check the wiring to make sure nothing is warming up.
Common Installation Mistakes and How to Avoid Them
Many trolling motor problems usually come from a small set of repeat mistakes, you’ve probably seen this happen. The most damaging one is often the wrong shaft depth. When a motor cavitates, it can lose thrust and put extra strain on the system. That stress builds fast, and I think it often shortens the motor’s lifespan. Testing shaft depth in real water makes a clear difference, especially once the boat is moving, instead of relying only on trailer measurements.
Another common issue shows up after a few outings: loose mounting hardware. Vibration can slowly work bolts free. Locking nuts help, and checking torque early is a smart move. But over‑tightening, especially on fiberglass decks, can cause cracks. A small mistake can turn into a big repair bill.
From my experience, electrical shortcuts cause the most trouble overall. Mismatched batteries or skipped breakers often fail later without warning. Joe Cermele from Outdoor Life often points out that many recreational breakdowns come from unsecured mounts and incorrect depth, which is why taking your time during setup really pays off.
The electric trolling motor market is projected to grow at a 6.22% CAGR from 2025 to 2035, driven by technological advancements, increasing recreational boating, and environmental regulations.
Advanced Considerations for 2026 and Beyond
Trolling motor installation is changing fast, and most boaters have likely noticed it by now. Brushless motors push harder than older setups and draw power in a different way, so clean, well‑planned wiring usually matters more than it once did. Lithium batteries are another big change. They reduce weight and extend run time, which feels great on long days, but they also require proper chargers and steady voltage protection, details that sometimes get overlooked and lead to problems later.
GPS features keep improving almost every season. Spot‑lock accuracy often depends on how the motor sits on the bow. When a mount is even slightly out of line, the boat can drift before anyone notices, and those small alignment issues become obvious once you’re on the water.
Deck reinforcement is becoming more common during installs. Spreading stress helps protect the hull over time, and by 2026 many boaters see it as a smart upgrade instead of an extra step.
For a clearer example of how these pieces connect, the Trolling Motors: Installation & Maintenance Guide walks through it all in one place. You can also explore Electric Trolling Motors: Eco-Friendly Fishing 2026 for sustainable boating insights.
Tools, Supplies, and Setup Tips That Make Life Easier
A smooth install comes down to having a few smart tools ready. The right gear can turn a frustrating job into something manageable. A torque wrench keeps bolts tightened to spec and helps prevent deck damage over time. Heat shrink connectors and cable clamps that secure wiring along the transom or inside the battery compartment block moisture and reduce strain where wires bend.
Thinking ahead also helps. Labeling wires seems basic, but future you will be thankful. Keeping a wiring diagram with your boat records means less guessing when troubleshooting or planning upgrades.
Seasonal checks, usually once a season, help catch problems early. Inspect mounts, watch for corrosion, and clean battery terminals so power stays steady.
Basic diagnosis can save time, like finding a loose connection before it costs a day on the water.
Answers to Common Questions
Most of the decision comes down to thrust. Heavier boats usually need more, especially when wind or current kicks in. Motor size depends on weight, length, and how you use the boat, slow fishing or cruising. You’ll often check manufacturer charts and add a safety margin.
Can I install a trolling motor myself?
Many boat owners can do it themselves with the right tools and a clear plan. The tricky parts are wiring and deck strength, which often confuse people; if that comes up, hiring a pro is usually the safer option.
How long does trolling motor installation take?
Rushing often causes mistakes. A basic install usually takes three to five hours, while adding deck reinforcement can take a full day. Taking your time is usually the smarter choice.
Are lithium batteries safe for trolling motors?
Generally safe if used the right way. Why? Lithium works best when the motor and charger support it; use proper breakers (don’t skip) and follow the brand’s guidelines.
How often should you check? At the start of each season (early), inspect the mounts and wiring. Check again after long trips or rough water, and you should be covered.
Putting It All Into Practice
The payoff is a motor that runs quietly and reliably, and that often comes down to how it’s installed. In 2026, electric trolling motors offer real benefits, but they still need care to deliver them. Good planning and clean wiring can protect the investment and save headaches later. A solid mount matters too, with no shortcuts, because it helps keep things safer on the water and stops small issues from showing up later.
Why rush something meant to last? Taking your time really helps. Measure twice before drilling (it’s boring, I know). Following the manufacturer’s specs and using marine‑grade parts that hold up over time are simple habits that turn a basic install into a setup you can trust.
For anyone upgrading or replacing a motor this year, this guide works well as a checklist, leading to a quiet, dependable partner on the next trip out.
