

Boat electrical problems can get confusing fast. One minute the lights work fine. The next, the bilge pump seems weak, the battery is dead, or a breaker keeps tripping for no clear reason. For many boat owners, marine electrical systems are hard to sort out because they combine water, vibration, corrosion, batteries, charging equipment, and wiring in a very tight space (which is a lot to handle). Even a small issue can be tough to track down in that kind of setup.
The good news is that basic maintenance and careful troubleshooting can stop a lot of common problems from becoming bigger ones. You do not need to be an electrician to catch trouble early. You can check battery terminals, spot damaged wires, test voltage, and notice warning signs before they get worse. What helps most is following a simple process and staying focused on safety (that part matters).
This guide explains how marine electrical systems work and the failures that show up most often. It also walks you through troubleshooting step by step, along with battery care, shore power safety, charging checks, and the point where calling a pro makes sense. For a more detailed overview, we covered that here: Understanding Your Boat’s Electrical System: Maintenance and Troubleshooting.
Why Marine Electrical Systems Fail So Often
Marine electrical systems take a beating. Boats deal with spray, humidity, heat, movement, long stretches of sitting unused, and salt that speeds up corrosion in all kinds of places. Vibration can slowly loosen terminals over time. Accessories added by owners can push older wiring beyond what it was built to handle. Even a small issue, like a loose crimp or a damp connection, can quickly turn into a serious safety problem.
The numbers support that. Claims data shared by Vessel Vanguard found that more than 50% of boat fires are linked to electrical systems. The same analysis said that more than one-third of all boat fires start in DC electrical systems. Another 9% come from AC shore power systems, which is still a clear share from one source.
| Electrical fire metric | Value | Why it matters |
|---|---|---|
| Boat fires tied to electrical systems | More than 50% | Electrical checks are a safety task, not just a maintenance task |
| Fires caused by DC systems | More than one-third | Batteries, wiring, lights, pumps, and accessories need regular inspection |
| Fires from AC shore power systems | 9% | Shore cords, inlets, and panels deserve close attention |
| Fires associated with engine or batteries | 19% | Battery and charging system care matters for every boat owner |
Regular checks make a real difference. A system that stays clean, dry, and secure is just safer. Green corrosion, taped repairs, and random add-ons all raise the risk, even when they seem minor at first. According to ABYC guidance, industry standards shape more than 90% of boats built in North America. That makes ABYC-based practices a reliable standard for safer maintenance and a practical way to judge what looks safe.
The Core Parts of Marine Electrical Systems You Should Know First
Before troubleshooting, it helps to know the main parts in most marine electrical systems. On the DC side, that usually means batteries, battery switches, fuses or breakers, cables, bus bars, switches, lights, pumps, electronics, and a charging source like an alternator or battery charger.
On the AC side, larger boats may also have shore power cords, inlets, AC panels, outlets, and chargers or inverters, so keep those in mind too.
The basic flow is simple: power leaves the source, moves through the correct wire and protection device, reaches the load, and returns through the proper path. If any link in that chain is weak, corroded, loose, too small, or wet, the equipment may stop working.
So where should inspection start? Start with the most visible and most common trouble spots on the boat. For additional reading, check out Marine Electrical Systems: Troubleshooting Common Issues, which expands on common failure points.
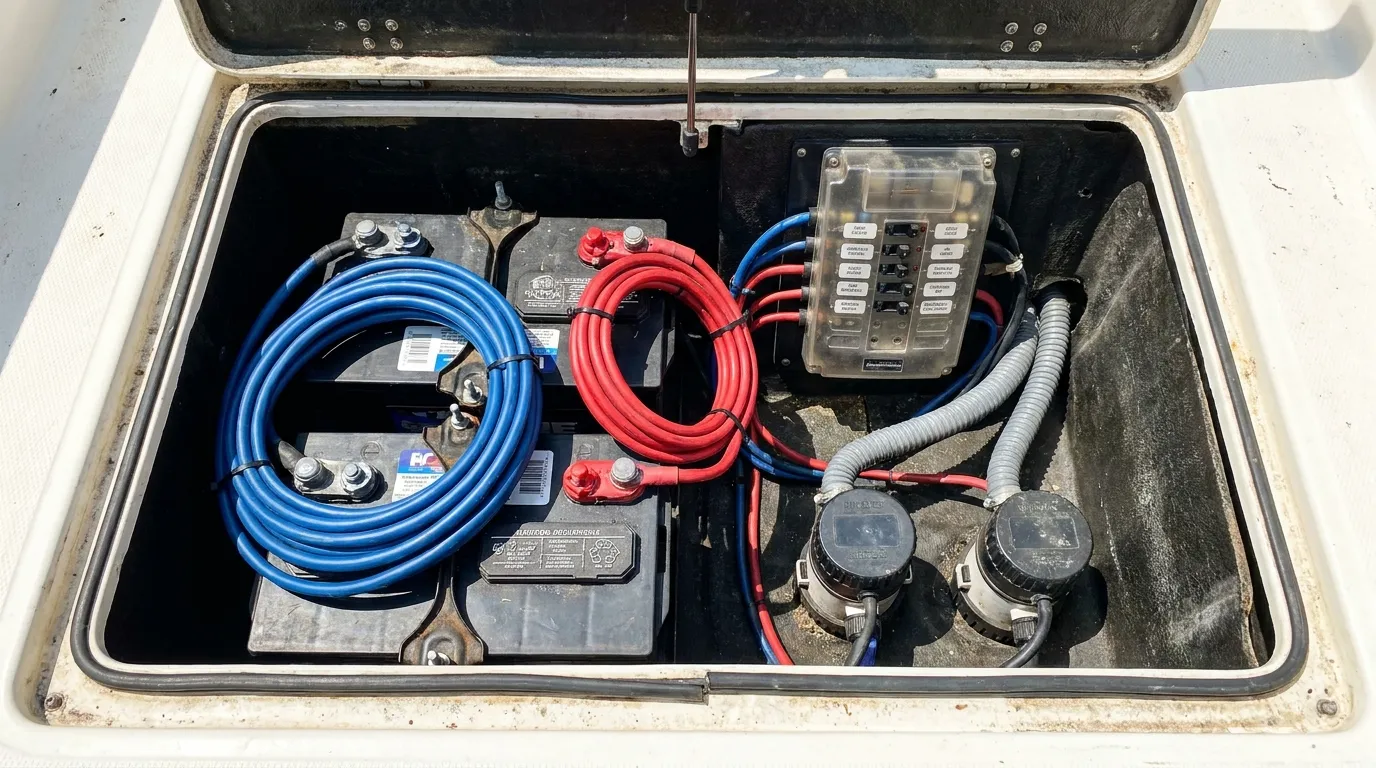
Battery area
Look for loose terminals, white or green corrosion, cracked cases, bulging batteries, and weak hold-downs, which are easy to miss. As Practical Sailor noted, ABYC rules say battery movement can’t be allowed.
Batteries are also required to be secured against movement, specifically no more than one-inch in any direction for at least one minute when exposed to 90 pounds of pull, or twice the weight of the battery (whichever is less).
Wiring and terminals
Check for darkened insulation, melted spots, stiff wire, loose crimps, or heat marks; it’s worth a quick check. Marine-grade wire and sealed connectors help, since moisture gets everywhere.
Panels and fuse blocks
If it’s safe, open the panel and check the basics first: corrosion, burned terminals, broken wires, and exposed conductors. Keep it simple.
If fuses keep blowing, there’s a real problem somewhere, not just bad luck. Don’t ignore that.
Need a hands-on checklist? Marine Electrical System Maintenance: Complete Boater Guide covers more inspection habits and routine service steps.
A Simple Marine Electrical Systems Troubleshooting Process That Actually Works
Good troubleshooting follows a clear path instead of guessing. If one device fails, don’t swap parts right away. Start at the source, then move through the system step by step, which helps a lot and keeps you from missing anything.
Step 1: Confirm the symptom
Is the problem constant, or does it only happen sometimes? Does it happen only when the engine is running, on shore power, or after rain? Those details can help point to the cause.
Step 2: Check the battery first
Use a multimeter to check the battery voltage. Even good equipment can seem faulty if the battery is weak. Also make sure the battery switch is in the right position, so it does not get missed.
Step 3: Check protection devices
Start with the fuses and breakers. If a fuse is blown, ask why first, seriously. Replacing it right away before finding the cause can lead to even more damage.
Step 4: Follow the circuit
Start by checking the battery for voltage, then move to the switch, which is usually pretty simple. After that, test the fuse block and then the device. If the voltage disappears anywhere, the fault is likely between the last good point and the dead one, that’s your clue.
Step 5: Check connections under load
A connector might look fine and still fail once current starts flowing. If lights dim or pumps slow down, check for voltage drop and feel for warm terminals (it’s a simple check). Finding those issues early can save trouble later.
Some warning signs are easy to miss, which makes them tricky: dim lights, dead electronics, warm plugs, a burnt smell, battery drain, and breakers that trip for no clear reason. For more DIY help, Troubleshooting Marine Electrical Systems: A DIY Guide explains these same checks in more detail.
Battery, Charging, and Shore Power Problems in Marine Electrical Systems
Many troubleshooting calls come back to batteries, charging systems, shore power, and the wiring connected to them. These areas carry real safety risk, so they need close attention.
Batteries need to stay clean, tight, dry, and properly vented where required. A battery that can shift around may damage cables or crack its case. Older batteries can still show voltage and then fail as soon as they are put under load. Because of that, a load test or conductance test gives a much clearer picture than a quick resting-voltage check.
Charging systems need the same care. Alternator problems can lead to strange electrical behavior, battery drain, or even damaged electronics. ABYC training includes a practical test point for AC ripple.
a reading of 0.4 volts AC at the battery indicates defective diodes you'll need to get the alternator serviced
Does your meter show unusual AC ripple at the battery while it is charging? Stop and check it right away. It is not the kind of reading to ignore.
Shore power brings its own risks. Shore cords should be checked for cracks, split insulation, taped repairs, discoloration, bent blades, corrosion, and other damage. You will also want to inspect the inlet for heat damage or signs of burning. Reverse polarity, damaged cords, and overheated plugs can become serious very quickly. Another common mistake is leaving electric heaters on when no one is aboard. Fire data shows unattended heaters are a major cause of AC electrical fires on boats.
New Trends Making Marine Electrical Systems More Complex
Boat systems keep getting more advanced. More owners are adding lithium batteries, digital switching, and connected electronics. Those upgrades can improve performance, but they also make troubleshooting much more technical and, at times, more frustrating.
LFP lithium is especially popular because it weighs less, charges faster, and usually lasts longer than many lead-acid batteries. Still, a retrofit needs careful planning. Chargers, battery management systems, alternators, and existing wiring all need to work together. If a boat is running mixed battery chemistries, that can also cause charging issues, and those can get complicated fast.
ABYC has updated standards to address newer battery technology, including E-11 for AC and DC electrical systems and E-13 for lithium-ion batteries. According to ABYC’s Brian Goodwin, current standards updates affect major onboard systems, especially electrical systems. Safety requirements are changing quickly, so staying current matters in a very practical way.
Connected electronics make diagnosis harder too. A problem may look like a failed device, while the real cause is power distribution, grounding, a damaged connector, or lost network communication. Modern troubleshooting goes beyond checking wires. It also means looking at both power and data, and how those systems interact.
Building a Smarter Marine Electrical Systems Maintenance Routine
Most problems show warning signs before they turn into real trouble, and a simple routine helps you catch them early. A quick monthly inspection during the season can save money and reduce stress later. It is a small habit, but over time it makes a real difference.
Start with a visual check. Open the battery area and look for corrosion, moisture, swelling, loose straps, and dirty terminals. Make sure the battery switch works properly. Check fuse blocks and any visible wiring for heat damage or brittle insulation. Before a trip, test pumps, lights, electronics, and navigation gear while the boat is still at home or at the dock, not just before leaving.
A few basic tools are good to keep onboard: a digital multimeter, spare fuses, heat-shrink connectors, marine-grade wire, zip ties, a flashlight, and dielectric grease. For maintenance items or replacement parts, First Choice Marine is a useful place to compare products for batteries, lighting, pumps, and other onboard systems.
Keep records too. Write down battery age, voltage readings, replaced fuses, and repeat faults. That makes patterns easier to spot. If a connector gets hot twice or a pump blows fuses every month, that is a clue worth checking.
Frequently Asked Questions
What is the most common problem in marine electrical systems?
Corrosion is one of the most common issues. It builds up on terminals, connectors, fuse blocks, and grounds, which increases resistance and causes voltage drop, heat, and device failure.
Can I troubleshoot boat electrical problems myself?
Yes, many basic checks are DIY-friendly. You can inspect wiring, clean battery terminals, check fuses, measure voltage, and look for heat or corrosion. But shore power, lithium retrofits, and repeated overheating should be handled by a qualified marine electrician.
Why do my boat lights dim when another device turns on?
That usually points to low voltage, a weak battery, poor charging, or too much resistance in the wiring. Loose connections and undersized wire can also cause dimming when current demand increases.
How often should I inspect my boat’s electrical system?
Do a quick visual check before each trip and a more detailed inspection at least once a month during heavy use. At minimum, inspect the full system at the start and end of each season.
What tools do I need for marine electrical troubleshooting?
A digital multimeter is the most important tool. It also helps to carry spare fuses, a flashlight, basic hand tools, wire cutters, marine-grade terminals, and heat-shrink materials for safe small repairs.
Keep Your Marine Electrical Systems Safer and More Reliable
Marine electrical systems do not have to seem mysterious. Once the main parts make sense, troubleshooting usually means checking the source, protection, wiring, connections, and load step by step, which is often easier than many boat owners expect. That process helps catch common problems like weak batteries, corroded terminals, damaged shore cords, loose grounds, and charging issues before they turn into failures that cut a trip short or create real safety risks.
Regular checks and early repairs go a long way. Warm connectors, burning smells, battery movement, dim lights, or blown fuses that keep happening are not random signs. They are warnings that point to a problem worth fixing before it gets worse.
Boats with shore power, inverter systems, or lithium upgrades need extra care and ABYC-based proven methods. If a fault keeps coming back, calling a certified marine electrician is safer than guessing. A clean, organized, well-kept system is easier to troubleshoot and more reliable when the boat is far from the dock. For extended reading, visit the Marine Electrical Systems Troubleshooting Guide or Marine Electrical Systems 2026: Adopting Next-Gen Power Innovations for Small Boats to explore advanced maintenance techniques.